Cloud CAL part 1

I can’t believe a week has passed since I introduced this CAL.   But here we are ready to start Part 1!   I hope you have selected your yarn and beads.  I have seen a few people considering the colour of beads, so if you are undecided I suggest you wait until you’ve done a bit of Part 1 and then try the beads against the crochet.

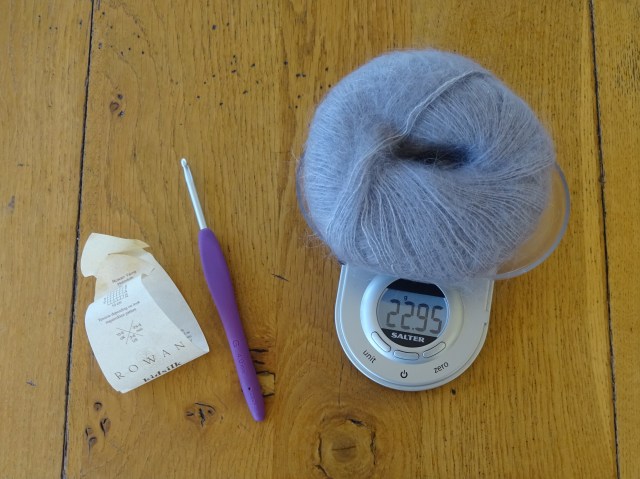
I am joining the CAL as well, and this is my yarn choice, plus some beads (I’m undecided on the beads):

DSC02849

The yarn is vintage Natural Dye Studio Cobweb, I have 50g with approx 360m – maybe I have enough for 2.  That would be good as I am so undecided on the beads – it gives me the option to try another colour of beads!

So are you ready?  Well, let’s start 🙂

First weigh your yarn.  Sometimes the ball is a slightly different weight to that expected.  Mine was only 22.95g rather than 25g but it had been lurking in my stash for years, so I may have used a little of it on a project.

DSC02800

You will need to weigh your remaining yarn regularly as you work.  So make a note of the amount you started with and keep those scales handy as you work.  Now do a little maths – first divide by 2 and then add 0.2g.   For me this was:

22.95 divided by 2 equals 11.475, add 0.2 equals 11.675.  I rounded this up to 11.7g

Keep a note of your number because you need to stop crocheting the first part when your remaining yarn weighs this amount!

What if you have more than a 25g ball?   Well, you work until you have used about 12.3g or the length is half what you want.

Tension/gauge does not matter for this design, but you do need to ensure you keep a loose stitch for a light and airy feel to the scarf.    For this you must allow the hook to decide the stitch size and do not pull the yarn tight when you complete each stitch.

I found 22.95g was sufficient for a scarf approx. 10cm wide by 220cm long (in Rowan Kidsilk Haze yarn, 22.95g is about 190m).   So unless you want a very long scarf, and provided you have a full ball of yarn, then you can afford to do a little tension trial to start with.  Try the first 4 rows – this should measure approx. 10cm wide and 5cm long.  It doesn’t matter if you are a bit out.  But if you are a lot out (say more than 20%) try using a different hook – bigger hook if your swatch is too small, smaller hook if you swatch is too big.  Having said that, if you like the look of your tension swatch it really doesn’t matter if it isn’t the correct size!

Now we can start crocheting!

The pattern is written in UK terms only, so here are the abbreviations I use (with US in brackets, if different):
st(s) = stitch(es)
sp(s) = space(s)
ch = chain
ch-sp(s) = chain space(s)
dc = double crochet (US single crochet)
tr = treble (US double crochet)
t2tog = work 2 treble together (US dc2tog, work 2 dc together)

Foundation: make 21ch

Row 1: Turn and work 1dc in 2nd ch from hook, (1dc in next ch, 1ch, miss 1 ch, 1dc in next ch) repeated until last ch, 1dc in last ch, turn.  You should have 6 1ch-sps and 14dc.

Now to make life easy for you when doing the next row, place a stitch marker in every 1ch-sp, like this:

DSC02804

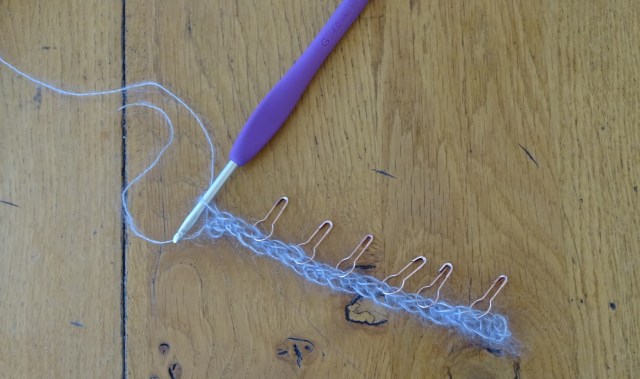
Row 2: 2ch, *(1tr, 1ch, 1tr) in 1ch-sp (where the stitch marker is), missing all the dc inbetween; repeat from * to last 1ch-sp, in this last 1ch-sp you do something slightly different: (1tr, 1ch) in last 1ch-sp, tr2tog placing first part in the same 1ch-sp and second part in last dc on the Row, turn.  You can remove your stitch markers now.

The first 2ch and 1tr together count as a tr2tog – so you start and end the row with a tr2tog which helps give a firm edge.

Row 3: 2ch, *(1tr, 1ch, 1tr) in 1ch-sp; repeat from * to last 1ch-sp, in this last 1ch-sp you do something slightly different: (1tr, 1ch) in last 1ch-sp, now tr2tog placing first part in last 1ch-sp and second part in last st on the Row (this is the top of the 2ch at start of last Row), turn.  You should now see that the pattern is a series of V sts.

Row 3 is the pattern, repeat it until your remaining yarn weighs that magic number you calculated – it must be no less than this number, so you may want to weigh your yarn regularly and estimate when that magic number will be reached.   I did a total of 77 rows.

This is how my stitches look, light and open with a lovely haze:

DSC02829

Do not break yarn when you reach the end – wait until next week when I show you what to do next!

Some tips on working this design:

As I mentioned in tension, let the hook decide the size of your stitch – do not pull the yarn once the hook is through the stitch as this will tighten it too much and you won’t get the open cloud-like effect.

It is very easy to miss the yarn and hook a bit of the fluff instead.  So check that you have placed you stitches correctly at the end of each Row.   It means stopping for a few seconds to look, but it is worth the effort as that check can save some frogging later.

If you do have to frog, go very slowly and use the hook to help break the fibres that somehow manage to blend together in the fluff, don’t use scissors as it is easy to have an accident and cut your yarn!

If you have plenty of yarn and want a wider scarf, then increase your foundation chain in multiples of 3ch, each 3ch extra gives an additional V st to each Row.

Please feel free to ask questions, here or on Ravelry or on Facebook.  And please share progress photos!

Until next week, happy crocheting xxx

Spring Lifter CAL part 2

This week I’m going to show you how to turn the motifs into the bag shape.  Here’s a reminder of the bag, so you know the shape you are aiming for:

Zingy spring lifter
Zingy spring lifter

First you need to block them.   If you leave it until you finish the bag you may find it a bit tricky.

Then you need to decide how you are going to join them.  I recommend joining in one of these 4 ways:

  1. By slip stitch holding the motifs right sides together, as I did for the Christmas CAL here.
  2. By double crochet (US single crochet) holding the motifs wrong sides together.
  3. By sewing.
  4. By slip stitch holding the motifs side by side, this is the method I used and I worked into the back stitch only.  You may find this a bit tricky if you haven’t done it before, but I think it gives a good effect and is worth that extra effort.  This shows you the technique:
Slip stitch side by side back loops only

And the finish:

Joined
Joined

I joined my bag using the same yarn that I used for the last round of my motifs – the Pastel Green.

To form the bag shape you need to join them in a particular order.  And I have illustrated this in the following diagrams:

Granny Tote Joining
Granny Tote Joining

It will take a while for you to make you bag shape, and you may find the last bits a little tricky.  So I will share how to finish your bag next week.

Keep posting progress and asking questions on my Ravelry forum.

Happy crocheting xx

Christmas CAL part 3

I’ve been busy today, so I apologise for being a bit late with this post.  My ‘busy’ was a family gathering.  It is always lovely to see the family, especially at Christmas.  And I do enjoy the catering for a crowd, which I don’t do very often.   Perhaps if I catered for a large group more frequently I wouldn’t enjoy it as much!

So now I am ready for some relaxing crochet.   Are you ready for the next motif?    I hope so, because here it is:

First a reminder of the ABBREVIATIONS:

The pattern is written in English crochet terms.

St = stitch

Ch = chain

Tr = treble (US dc)

Ss = slip stitch

Sp = space

Ch-sp =chain space

This is the third motif design, I am making 10, 2 in each of my chosen colours.

I call it the GRANNY 3 MOTIF:

Granny 3 motif
Granny 3 motif

Foundation:  Make a 4ch foundation ch and join into a ring with a ss

Round 1: 5ch (counts as 1tr, 2ch), (3tr, 2ch) 3 times into the ring, 2tr into the ring, join to 3rd st of first 5ch with a ss.

Round 2: ss into 2ch-sp, (note for this and each subsequent round: this ss is to position the start of the round in the right place) 5ch (counts as 1tr, 2ch), (3tr, 1ch) into the same 2ch-sp, (3tr, 2ch, 3tr, 1ch) into each of the next three 2ch-sps, 2tr into the first 2ch-sp, join to 3rd st of starting 5ch with a ss.

Round 3: ss into 2ch-sp, 5ch (counts as 1tr, 2ch), (3tr, 1ch) into the same 2ch-sp, *(3tr, 1ch) into the next 1ch-sp, (3tr, 2ch, 3tr, 1ch) into the next 2ch-sp; repeat from * another 2 times, (3tr, 1ch) into the next 1ch-sp, 2tr into the first 2ch-sp, join to 3rd st of starting 5ch with a ss.

Round 4: ss into 2ch-sp, 5ch (counts as 1tr, 2ch), 2tr into the same 2ch-sp, 1tr into each tr and 1ch-sp along each side and (2tr, 2ch, 2tr) in each 2ch-sp on the corners, finish with 1tr in the first 2ch-sp and join to 3rd ch from start with a ss.  You should have 15tr along each side and 2ch in each corner of your motif.

Round 5: ss into 2ch-sp, 5ch (counts as 1tr, 2ch), 2tr into the same 2ch-sp, 1tr into each tr along each side and (2tr, 2ch, 2tr) in each 2ch-sp on the corner, finish with 1tr in the first 2ch-sp and join to 3rd ch from start with a ss. You should have 19tr along each side and 2ch in each corner of your motif.

Round 6: Repeat Round 5. You should have 23tr along each side and 2ch in each corner of your motif.

Break yarn and fasten off leaving a long tail about 3m long for sewing or crocheting together later.

Tomorrow, yes so soon, I will publish the last 2 motifs.  I know some of you are powering away with your hooks, I can see the smoke from here!  And those of you who haven’t progressed as quickly may like a little variety.

On Wednesday I will share my 2 proposals for layout, suggestions on how to join and my little embellishment.

And on Friday I will give you ideas on edging – mine will be simple.

As always, how you finish your blanket will be up to you, so all my ideas are only here to help inspire you.  I love seeing variations, so please feel free to adapt as you like.

Please share your progress on the discussion thread on my Ravelry Group here.

Happy crocheting xxx


Now for the legal stuff – I designed this, it’s all my own work and is copyright. Please feel free to make as many as you like, but not for commercial purposes, and please credit me with the design. Thank you!

Christmas CAL part 2

How are you all doing?   Did you finish the motifs from part 1?

I didn’t do too much yesterday, I was far too busy eating and drinking!   But I did have a flash of inspiration after all that excess, a little embellishment for the blanket – so this will be included in one of next week’s updates.

I have seen some progress on Ravelry, and I know some of you have completed 9 squares and therefore must be ready for this instalment.  So here it is:

First a reminder of the ABBREVIATIONS:

The pattern is written in English crochet terms.

St = stitch

Ch = chain

Tr = treble (US dc)

Ss = slip stitch

Sp = space

Ch-sp =chain space

This is the second motif design, I am making 10, 2 in each of my chosen colours.  I call it the FULL MOTIF 1:

FULL MOTIF 1
FULL MOTIF 1

Foundation:  Make a 4ch foundation ch and join into a ring with a ss

Round 1: 5ch (counts as 1tr, 2ch), (3tr, 2ch) 3 times into the ring, 2tr into the ring, join to 3rd st of first 5ch with a ss.

Round 2: ss into 2ch-sp, (note for this and each subsequent round: this ss is to position the start of the round in the right place) 5ch (counts as 1tr, 2ch), 2tr into the same 2ch-sp, 1tr into each tr along each side and (2tr, 2ch, 2tr) in each 2ch-sp on the corner, finish with 1tr in the first 2ch-sp and join to 3rd ch from start with a ss. You should have 7tr along each side and 2ch in each corner of your motif.

Rounds 3 to 6: Repeat Round 2. The number of tr along each side increases by 4 with each round. So after Round 3 you have 11tr, after Round 4 you have 15tr, after Round 5 you have 19tr and after Round 6 you have 23tr.

Break yarn and fasten off leaving a long tail about 3m long for sewing or crocheting together later.

Please share your progress on the discussion thread on my Ravelry Group here.

Stay tuned for the next instalment, which I aim to publish on Sunday……..

Happy crocheting xxx


Now for the legal stuff – I designed this, it’s all my own work and is copyright. Please feel free to make as many as you like, but not for commercial purposes, and please credit me with the design. Thank you!

Little beaded crochet pot

A few days ago I posted a photo of the little crochet beaded pot that I made with some leftovers. Here it is:

Beaded pot
Beaded pot

I thought you might just like the pattern. It’s a lovely quick project, and great for using up little bits of leftover yarn and beads. So here’s the pattern:

You will need:
Rowan Cotton Glace, 100% cotton, 50g/114m per ball (approx. 10g/25m used)
30 size 6 beads
3.0mm (US D/3) crochet hook
Tapestry needle
Sewing needle and thread

Tension/gauge
Tension is not important for this design, just ensure you have a nice tight finish..

Finished size will vary depending on your tension. My pot is 4.5cm in diameter and 4cm high (that’s about 1.75″ by 1.5″)

Abbreviations
Note – these are all English crochet terms but the only stitch in this pattern that is different in US terms is the dc – so just swap dc for sc if you want US terms
st = stitch
ch = chain stitch
ss = slip stitch
dc = double crochet
Magic ring = make a magic ring, hold thread in your hand and wrap working yarn around forefinger twice to create ring, slip ring off your finger and insert hook to pick up first st, 1ch, then work the necessary sts for round 1 and close the ring tightly by pulling the loose end.
bdc = beaded double crochet – insert hook into st, yarn round hook and draw loop through st, push bead close to hook, yarn round hook and pull yarn through both loops on hook making sure bead is trapped in the st.
BLO = work sts in back loop only
RS = right side
WS = wrong side

Instructions
Thread beads onto yarn (see tip below pattern)

Start with a magic ring
Round 1 (RS)
1ch (does not count as st), 6dc in ring, pull ring tight, ss to 1st dc (6 sts)

Round 2
1ch (does not count as st), 2dc into st at base of ch, 2dc in each st to end, ss to 1st dc (12sts)

Round 3
1ch (does not count as st), 1dc into st at base of ch, 2dc into next st, (1dc into next st, 2dc in next st) 5 times, ss to 1st dc (18 sts)

Round 4
1ch (does not count as st), 1dc into base of ch, 1dc into next st, 2dc into next st, (1dc into each of next 2 sts, 2dc in next st) 5 times, ss to 1st dc (24 sts)

Round 5
1ch (does not count as st), 1dc into st at base of ch, 1dc into each of next 2 sts, 2dc into next st, (1dc into each of next 3 sts, 2dc in next st) 5 times, ss to 1st dc (30 sts)

Round 6
Work this round in BLO, 1ch (does not count as st), 1dc into st at base of ch, 1dc into each st around, ss to 1st dc (30 sts)

Round 7
1ch (does not count as st), 1dc into st at base of ch, 1dc into each st around, ss to 1st dc (30 sts)

Round 8
Turn to work with WS (inside of pot) facing you, 1ch (does not count as st), 1dc into st at base of ch, 1bdc into next st, (1dc into next st, 1bdc into next st) 14 times, ss to 1st dc (30 sts)

Round 9
Turn to work again with RS facing, 1ch (does not count as st), 1dc into st at base of ch, 1dc into each st around, ss to 1st dc (30 sts)

Rounds 10 to 15
As round 7

Round 16
As round 8

Round 17
As Round 9.

Break yarn, fasten off and sew in ends.

TIP: Threading beads onto yarn
To thread beads onto yarn, first thread a sewing needle with sewing thread and tie in a knot. Loop the yarn through the sewing thread. Thread beads onto needle, along thread then onto yarn. Always thread more beads on than you need, as you may decide to adjust the size or you may make a mistake. It’s better to have unused beads left on the yarn rather than run out and have to cut and re-join the yarn if you do need to add beads.

Threading beads onto yarn

Please note this pattern is my design and the pattern and photos are copyright.

I hope you like the pattern. And please share photos of any little beaded pots you make.

Happy crocheting xxx

PS I am human and can make mistakes, so if you spot a mistake in the pattern please let me know and I’ll correct it.

An anniversary gift…

To celebrate my first blog birthday, I thought I should give all my readers a little gift. So I sat down a couple of days ago with my hook and designed a little flower. I got carried away, I couldn’t just make one…….I became a little addicted.

Here it is:

Anniversary Crochet Flower

I have written the pattern below, but I have also charted it. If you want the chart you can find it as a free download on Ravelry here.  It is also available on LoveCrochet here.

So here is the pattern:

ANNIVERSARY CROCHET FLOWER

This is written in English crochet terms and uses standard abbreviations.
It is made in the round, like a little motif. It is written as if the same colour of yarn is used throughout, so if you want to use a different colour, just break the yarn at the end of the round, fasten off and start with new yarn at the start of the next round.

Abbreviations used:
MR = magic ring – hold thread in hand and wrap working yarn around forefinger twice to create ring, slip ring off your finger and insert hook to pick up first st, 1 ch, then work the necessary sts for round 1 and close the ring tightly by pulling the loose end.
st = stitch
ss = slip stitch
sp = space
ch = chain
dc = double crochet
tr = treble
htr = half treble

I used a 4mm hook (US G/6) and some DK weight yarn, but you can use any yarn as long as you use a suitable hook.

3 colour flower
3 colour flower

Round 1 – make a MR, 1 ch (does not count as a st), 6 dc in ring, pull end tight, ss to 1st dc to join. (NOTE: sometimes this ss wants to be a st! And you may find when you do round 2 that you have one st too many, to remedy this just do 5 dc not 6 dc)
Round 2 – 1 ch (does not count as a st), [1 dc, 3 ch] in each st around, join to 1st dc with a ss (you have 6 3ch sps)
Round 3 – 1 ch (does not count as a st), [1 dc, 1 htr, 3 tr, 1 htr, 1 dc] in each 3ch sp around, join to 1st dc 1ith a ss. Break yarn and fasten off.

Sew in all ends, then enjoy!

You can get a different look depending on how many colours of yarn you use. For some flowers I used one colour for rounds 1 and 2 and a second colour for round 3. On others I used a different colour each round.

What to make with these flowers? Well, lots of things – brooches, hair clips, embellishments, string up as bunting………….just use your imagination. And please let me know what you make.

Happy anniversary xx

Now for the legal stuff – I designed this, it’s all my own work and is copyright. Please feel free to make as many as you like, but do not copy the pattern and please credit me with the design. Thank you!

Curvy Star Hexagon

I talked about my hexagon project yesterday and I’ve been pondering ever since.  Maybe you won’t understand my love of hexagons…or will you?  So I thought I would share another small hexagon design with you just to see if it whet’s your appetite!  Please do tell me what you think of it.

As I made it I was thinking of a star but, as so often happens when I get a hook in my hand, it took on a life of its own – and this little curvy star was born.

Image

Do you like it?  Subconsciously I must have thought of the blanket I want to make, which I want to be ‘open’ but snug, because I think it is perfect for what I want in that blanket and that’s what I will make with it. It is 3 rounds and really not too difficult to make if you can crochet in the round.  Here’s the pattern:

This is written in English crochet terms and uses standard abbreviations.

 st = stitch

ss = slip stitch

sp = space

dc = double crochet

tr = treble

htr = half treble

dtr = double treble.

I used a 5mm hook (US H/8) and some aran weight yarn, but you can use any yarn as long as you use a suitable hook.

Foundation – make 6 ch and join into a ring with a ss

Round 1 – 3 ch (counts as 1 tr), 1 tr, 1 ch, (2 tr, 1 ch) 5 times, join to 3rd ch from start of round with a ss

Round 2 – ss into gap between first 2 tr from last round (if you are changing colour join your new colour here), into this gap crochet (3 ch (counts as 1 tr), 1 tr, 1 ch, 2 tr, [into next 1 ch-sp, crochet 1 dc, into the gap between next 2 tr from last round crochet (2 tr, 1 ch, 2 tr)] five times, into next 1 ch-sp, crochet 1 dc, join to 3rd ch from start of round with a ss

Round 3 – ss into top of 3 ch from start of last round (if you are changing colour join your new colour here), [(1 htr, 1 tr, 2 dtr, 1, tr, 1 htr) in 1 ch-sp, ss into 2nd tr along, ss into next tr along] five times, (1 htr, 1 tr, 2 dtr, 1, tr, 1 htr) all in 1 ch-sp, ss into 2nd tr along, ss to first ss to complete the round.  Break yarn and fasten off.

If you want to join the motifs together, join between the 2 dtr at the tip of each curve on the last round.

For those who like charts, here’s one for you (this uses standard symbols)But please note this is copyright – do not repost/pin this or you will be in breach of that copyright:

Image

Now for the legal stuff – I designed this today, it’s all my own work and is copyright.  Please feel free to make as many as you like, but not for commercial purposes, and please credit me with the design.  Thank you!

I am human (yes, I am!) so I am perfectly capable of making mistakes!  So if you spot any errors in the pattern please just tell me and I’ll correct it. 

Happy knitting and crocheting

xx

PS For those who are interested, I use Stitchworks software to chart.