This is the fifth design in the Hooking Up! ebook.
It is included in the book by special permission of the designer Amanda Perkins. You can read all about Amanda on her blog, she creates the most beautiful crochet designs and has a brilliant eye for colour. I am proud to call her my friend and I am probably one of her biggest fans!
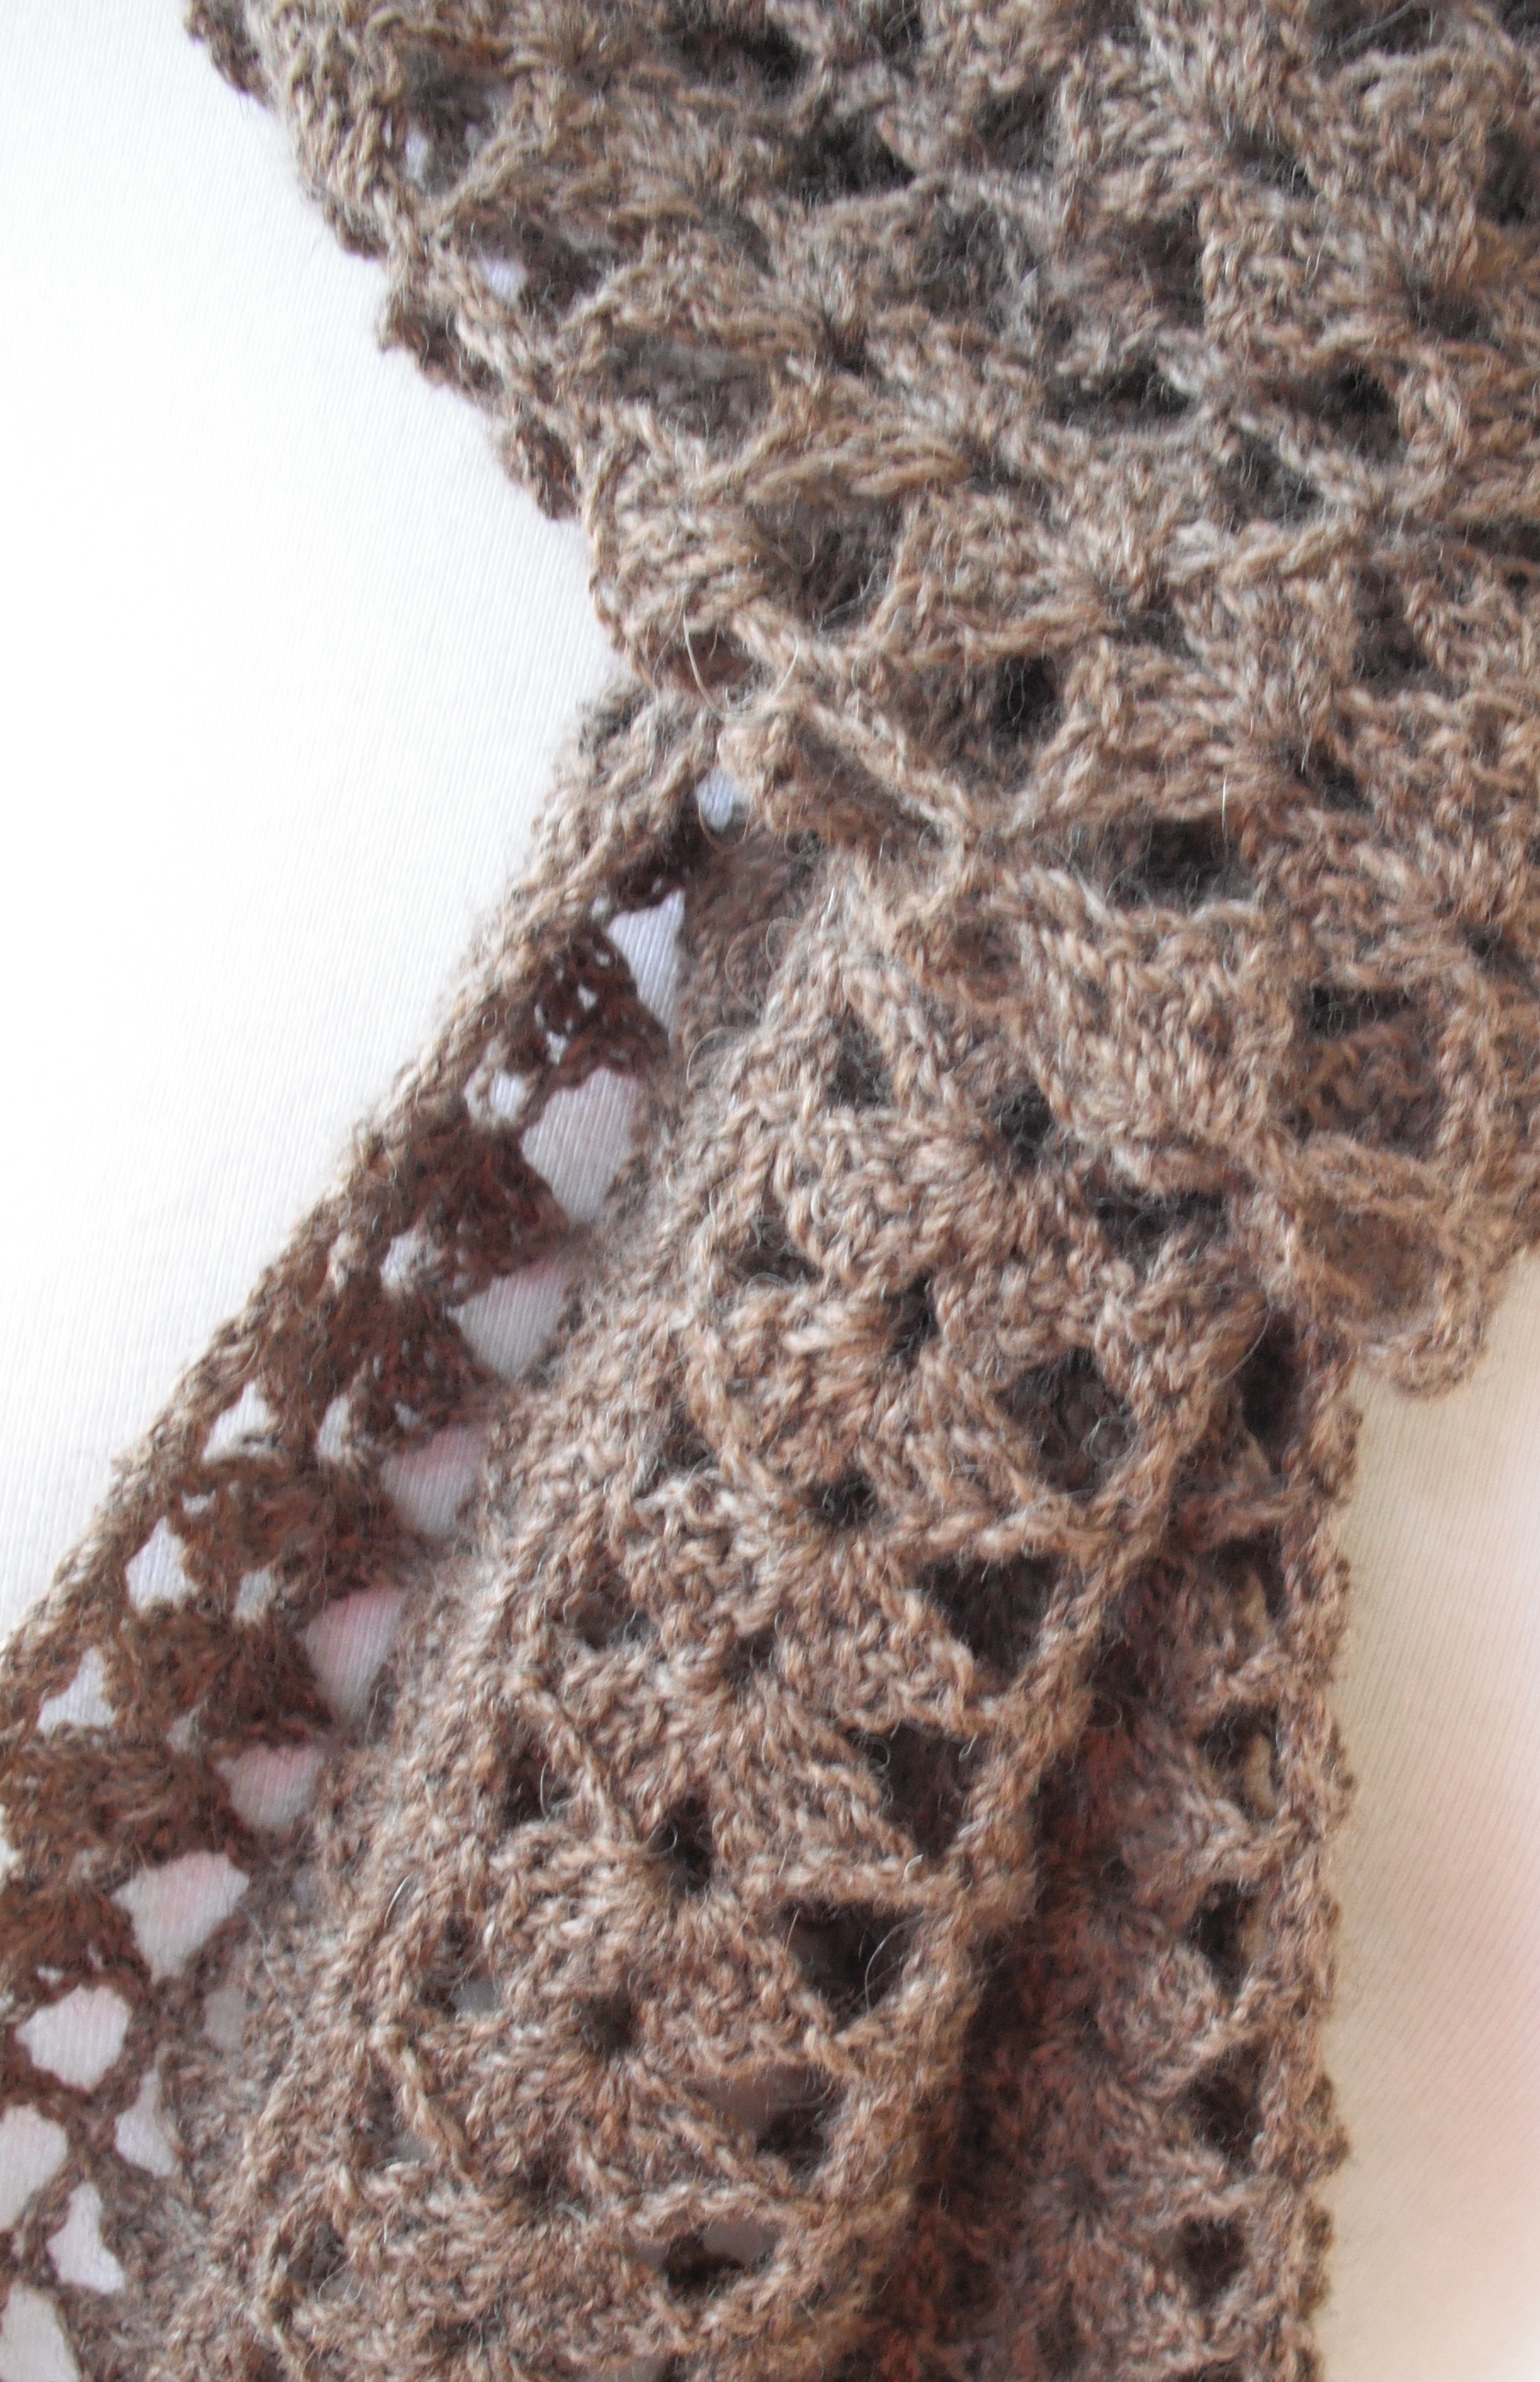
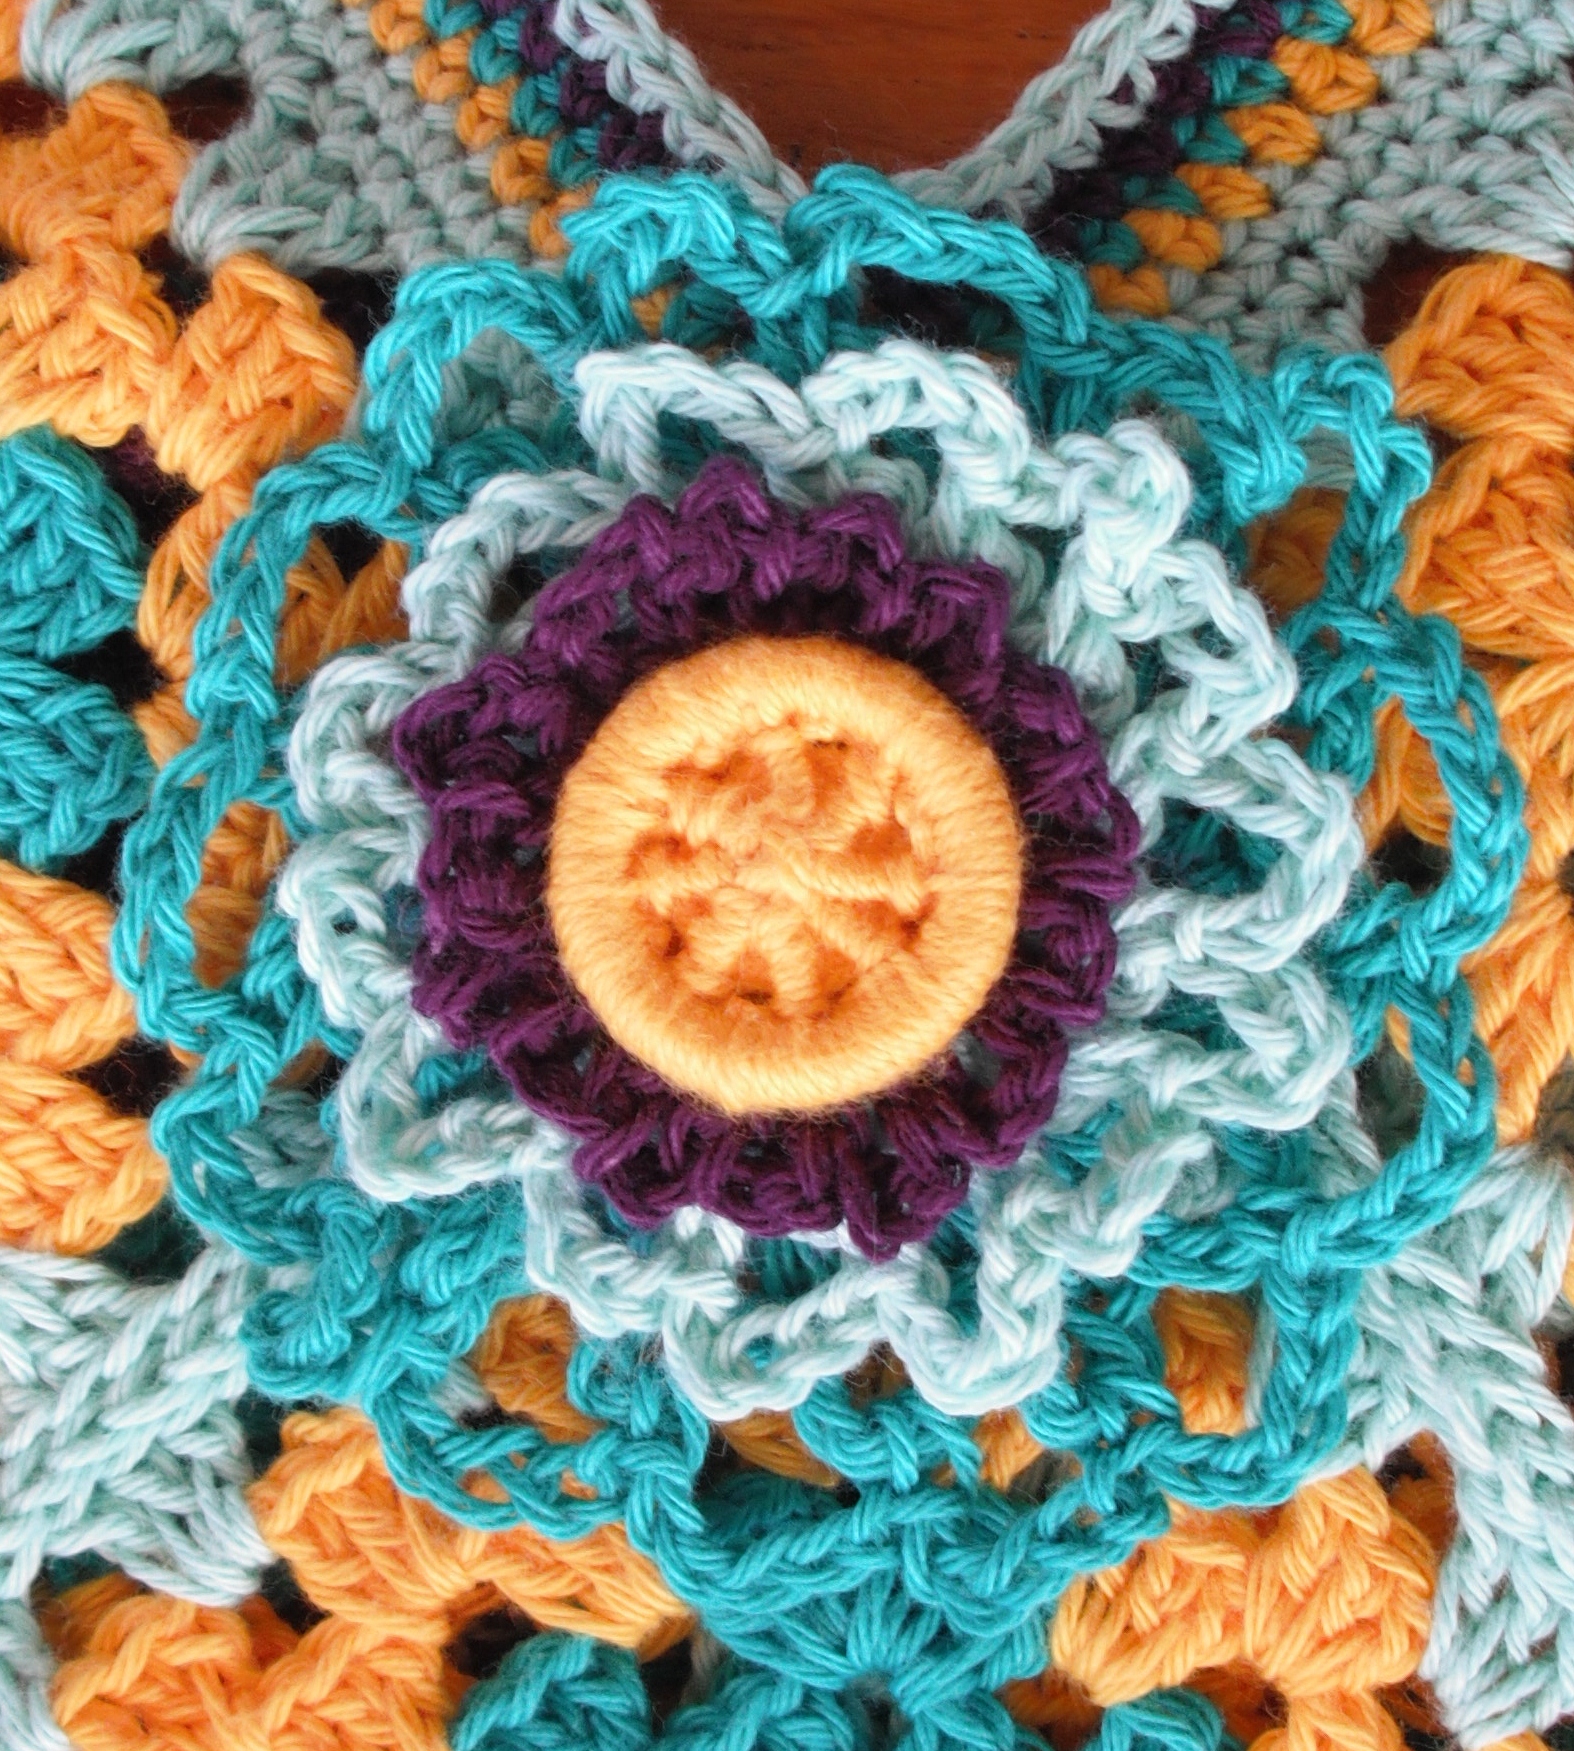
This design is the Cassia Cowl.
Cassia
The photograph is the cowl I made for the ebook. I used a different yarn to the one Amanda used originally, to show that it is adaptable and because I wanted to! It is made with motifs that are joined as you go. If you have followed the ebook through you will understand how to join as you go by the time you reach this pattern. I love working with motifs, especially those that are hexagonal (six-sided or six-pointed) and this one is straightforward to make yet looks so beautiful.
This is a Mobius Cowl, so it needs careful attention when joining into the cowl shape. The ebook provides detailed instructions of 2 ways in which you can do this.
This is not exclusive to the ebook, you can buy Amanda’s individual pattern here.
Tomorrow I will share the last design in the ebook, another by Amanda Perkins.
The next design in the Hooking Up! ebook is a baby or lap blanket.
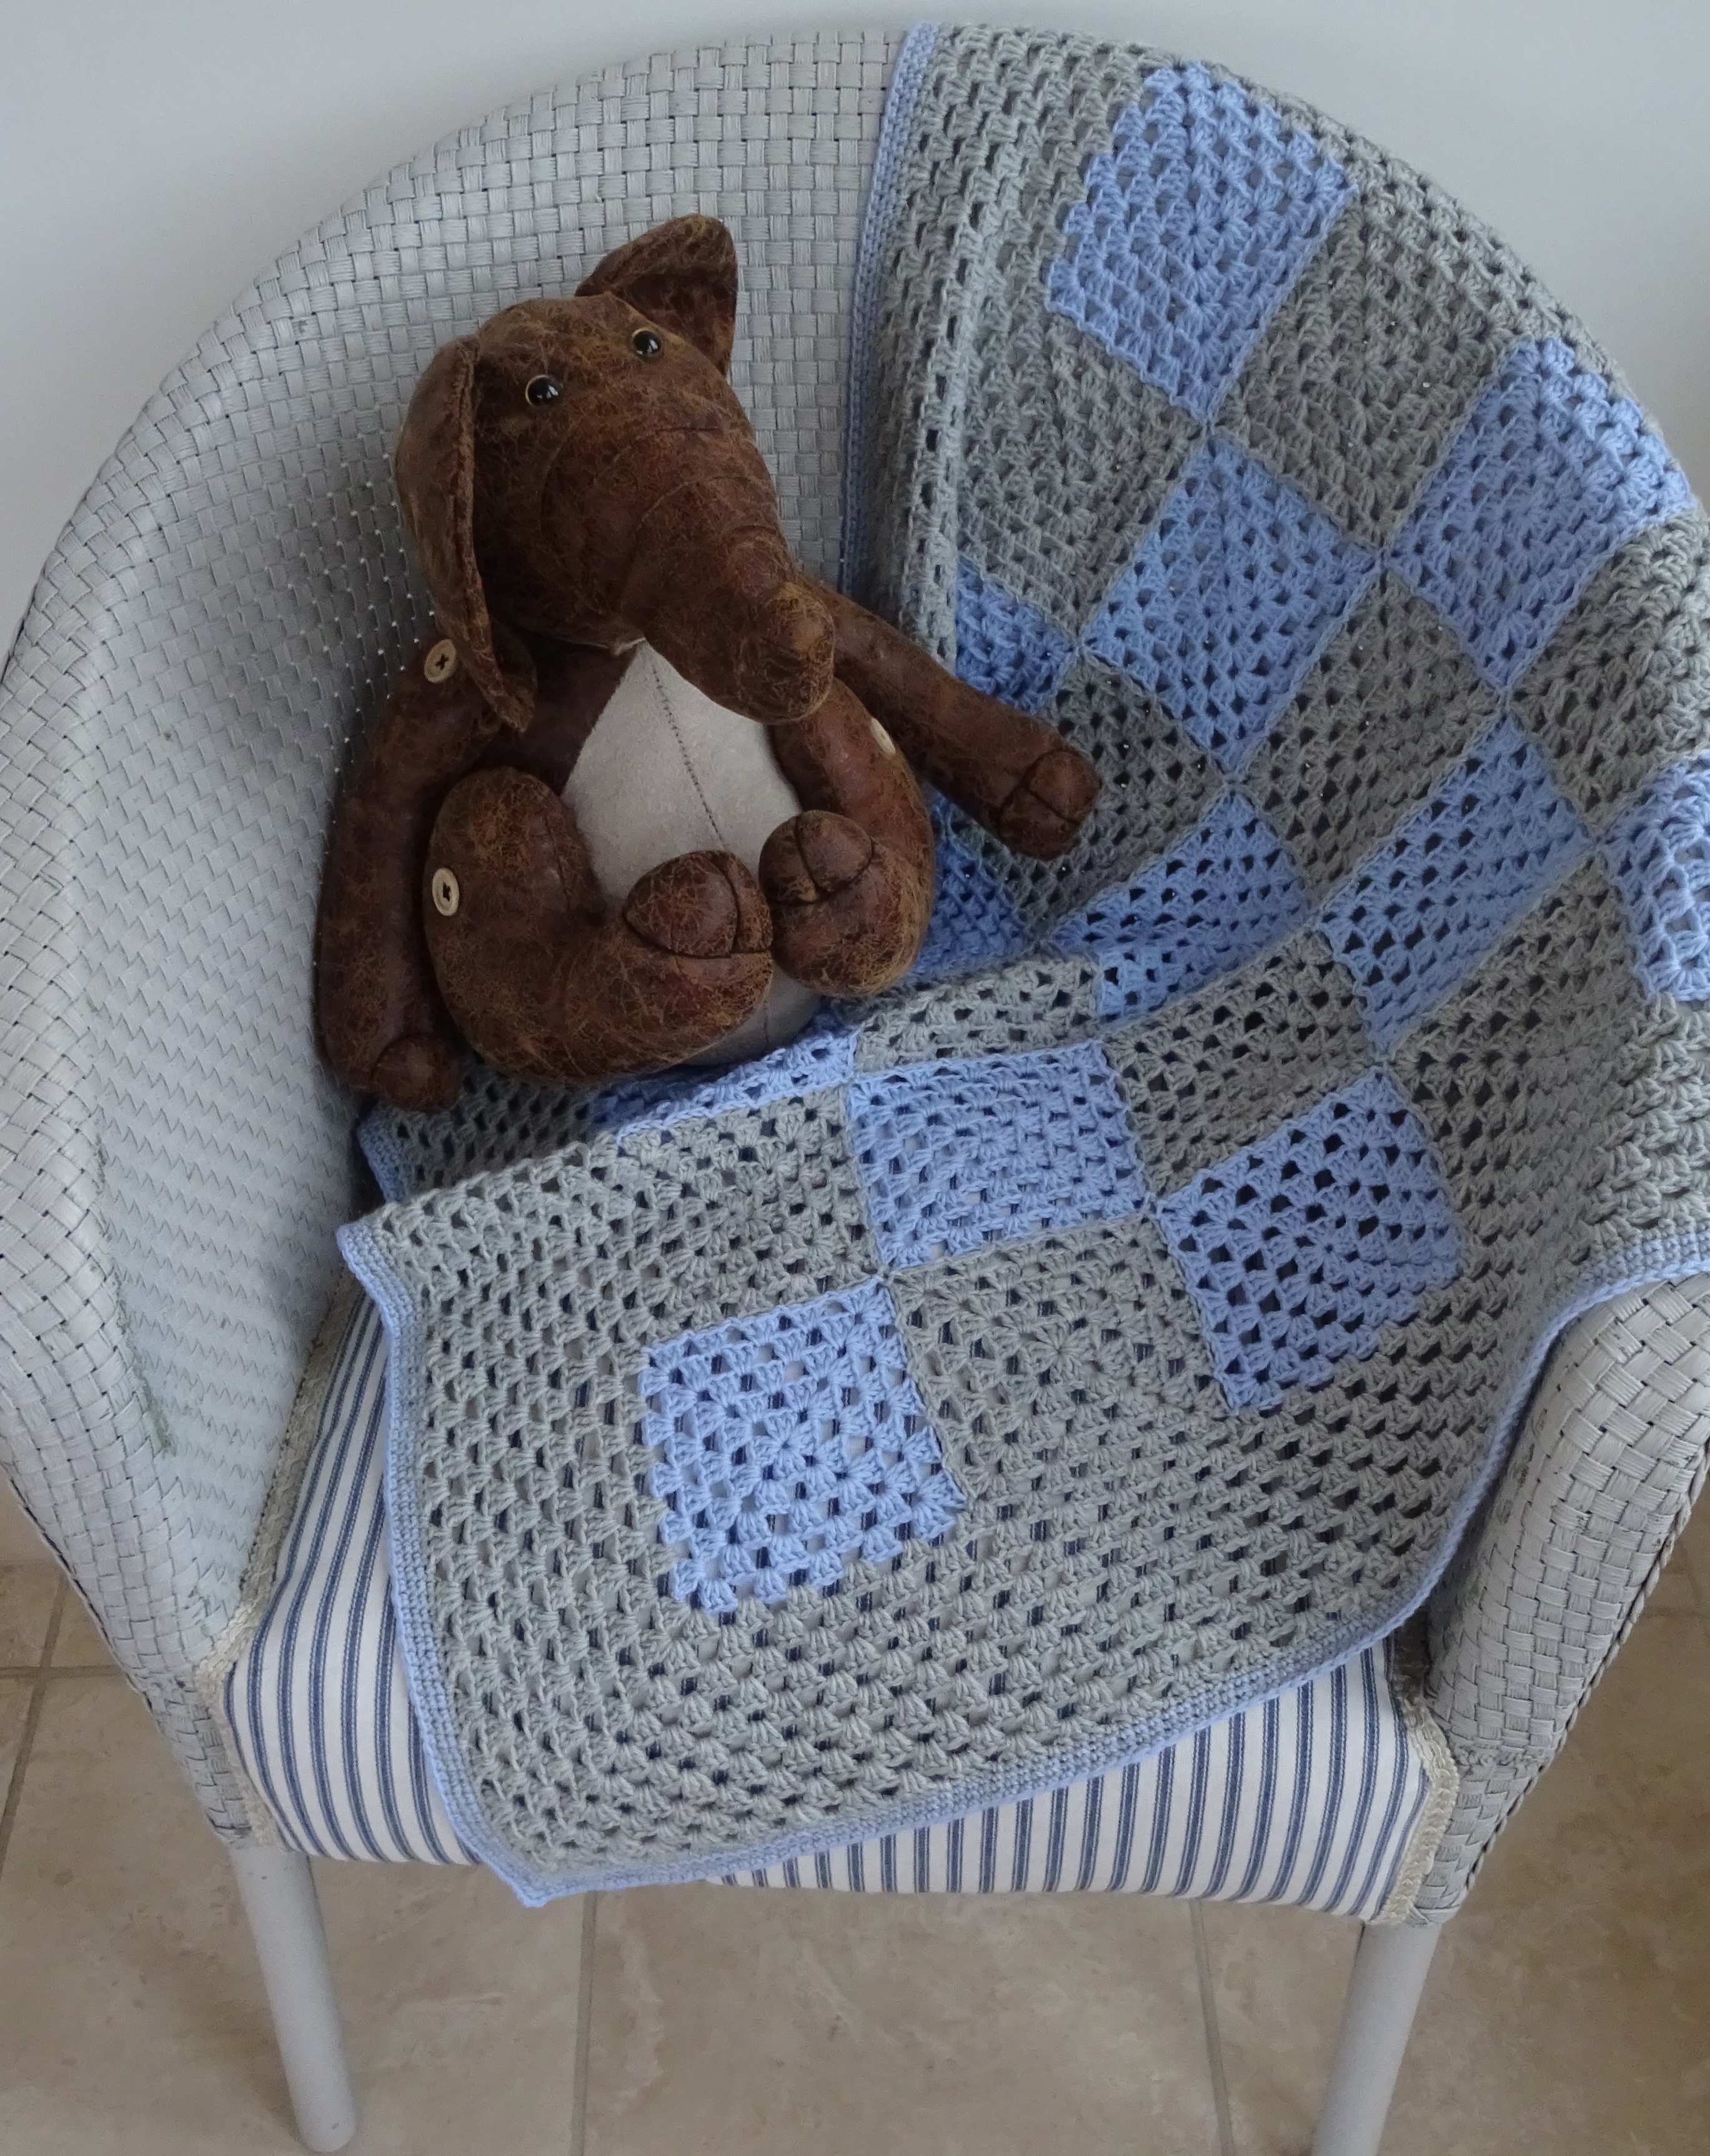
Granny Blue Lap Blanket
Again this design is exclusive to the ebook. I love this blanket, it was a joy to make and it is a perfect size for the chair, and is an ideal size for a baby!
It is included because it teaches some important techniques. The first is how to join motifs as you go (rather than crochet them together or sew them together later); this is a technique which is used in many motif projects. To help you there are a few photos showing the technique.
The second technique is how to do a ‘granny’ border that lies flat. Too often I see granny blankets with a ‘granny’ edging that looks wavy rather than flat and it is very easy to avoid this if you know how.
Finally it has a nice final edging which is firm and very practical.
If you haven’t made a granny blanket before then this is a good one to try, provided you want to learn a few new techniques.
This is the third design in the Hooking Up! ebook – the Round and Round Cowl.
Round and Round Cowl
I love cowls, I find them better than scarves if I am out and about because they stay where you put them – around your neck! There is nothing more frustrating than having your scarf fall off or worse still trip you up. A bonus for a crocheter or knitter is that they use less yarn and are quicker to make than most scarves.
This design is exclusive to the ebook; you will not find it elsewhere. I added it because it is a good one to learn how to make things in the round. It is made using a Bulky yarn (Rowan Cocoon) which means you have less stitches to deal with when you are starting off, perfect for your first project in the round.
There are charts included with this design, as with the other designs in the ebook, but they are not compulsory. If you want to learn how to read a chart then the one with the Simple Scarf will help you get started. But if you don’t like charts, just ignore them!
The second design in the Hooking Up! ebook is the April Scarf.
April Scarf
This was published in April 2014 as part of my 2014 scarf a month challenge. But I decided it is also a good fit in the ebook. The Simple Scarf uses a dk/worsted weight yarn but this April Scarf moves onto a 4ply/fingering yarn and, although not compulsory as you can use any weight of yarn, practice with finer yarns is an important step if you want to increase your crochet repertoire. It will stretch the new crocheter a little, giving them a couple more stitches to use and some interesting challenges about placing stitches. So completing this should be a real confidence booster!
If you try this pattern, or any in the ebook, and find you have any difficulties then please do join the Ravelry forum here and ask questions – I will be happy to answer them but also you will find there are plenty of helpful crocheters on the forum.
This week I published a new ebook: Hooking Up!
This ebook contains 6 patterns that are ideal for those who have just learnt to crochet as well as experienced crocheters.
Hooking Up!
If you are new to crochet then you will gain experience and learn new techniques as you work through the 6 designs. The book also provides good reference material – a reminder of the stitches used, the importance of tension and how to adjust your hook size, what to have in your beginner crochet kit, all about blocking and lots of other useful reference material.
If you are experienced at crochet then you will find some beautiful projects which you can make quickly and adapt to your requirements.
Over the next week I will be featuring each pattern in turn. Today it is Simple Scarf.
Simple Scarf
I designed this especially for some gorgeous silk yarn by Willow Knits and I used 5 mini skeins. However, it is adaptable and can be used with any type of yarn – ideas on how to adapt are provided in the ebook. Here is one I made using a single ball of Rowan Kidsilk Haze:
Simple Kidsilk Scarf
If you make a mistake counting your foundation chain on this pattern then you will find a cure – I provide instructions on how to work with this little mistake without having to take back your work; a simple scarf with simple solutions!
The other patterns in the book are April Scarf, Round and Round Cowl, Granny Blue Lap/Baby Blanket and, by special permission, Cassia Cowl and Starry Night Blanket by Amanda Perkins. More information on these 5 patterns will feature in future blogs.
This blog post shows you how to finish your bag. It’s a bit long, but it isn’t difficult. So please just take the time to read it and then begin the final stage.
First you need to strengthen the top edge of the bag, then you need to add handles. I did all of this in double crochet (US single crochet).
I am using English crochet terms – check back here if you need reminding what there are.
Here is how I did it:
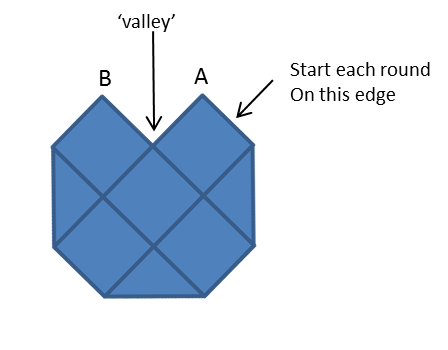
The diagram below shows one side of the bag. Start each round at the point indicated by the arrow on this diagram.
The first 2 rounds strengthen the top edge.
Round 1: Using Yarn D (mine was Pastel Green), work 1 round of double crochet, place 1dc in each tr or 1ch-sp along the edges. At the top corners of the squares (Points A and B) put 3 dc into each 2ch-sp and place a stitch marker into the middle of these 3dc. At the ‘valleys’ work 3dc together. Join the round with a ss.
Round 2: work another round of dc, working 1dc into each stitch around. At point A. put 2dc into the stitch marked, remove stitch marker and replace into the first of these 2 dcs. At the valleys, work 3dc together. At point B, put 2dc into the stitch marked, remove stitch marker and replace into the second of these 2 dcs. Repeat with points A and B on the second side.
Join the round with a ss, break yarn and fasten off.
Now you’ll make the handles.
Handles
Round 3: Join yarn C (mine was Canary yellow) at the point shown in the diagram, work 1dc into each stitch up to and including the first stitch marker at point A, *move stitch marker to next dc along at point A, work 80ch, then miss all stitches between points A and B and work 1dc into stitch marked at point B (these 80ch will form the handle – you may wish to make them longer or shorter, so just check that you are happy with the length before continuing), work 1dc in each stitch down from point B, work 3dc together at the next valley**, work 1dc in each st up to the next point A and repeat the instructions from * to **, finally work 1dc in each st back to the start, join with ss, break yarn and fasten off.
That was the tricky bit – now you will work the top edges of the handles.
Round 4: join yarn B (mine was Sea green), work 1dc in each st around, working 3dc together in the valleys. Break yarn and fasten off.
Round 5: Join yarn A (mine was Heath), work 1dc in each st around, working 3dc together in the valleys. Break yarn and fasten off.
Round 6: Join yarn D (mine was Pastel green), work 1dc in each st around, working 3dc together in the valleys. Break yarn and fasten off.
The final stage is to work the inner edges of the handles (the edges between points A and B that you left unworked on round 2) – there are 2 of these and you work both of them the same as follows:
Rejoin Yarn C (canary yellow) to the first stitch marker (the one you moved at point A), work 1 round of dc, placing 1dc in each st or the underside of the (canary yellow) chain of the handle, and working 3dc together in the valley. Now work 3 more rounds of dc – in yarn B, then yarn A, then yarn D (remember to work 3dc together in the valley).
You may find that you want to add more rows of dc to make the handles larger. Mine were perfect for my use.
You may wish to personalise your bag, and there are lots of ways you can do this. I made a little flower with a Dorset button in the centre.
Dorset button flower
First make a Dorset button – there are some excellent instructions here. I made mine in canary yellow.
Now make a simple flower. I used this motif pattern:
Foundation ring: make a 4ch foundation and join into a ring with a ss
Round 1: 2ch (counts as 1htr), 14 htr in ring, join to 2nd ch from start with a ss. (15htr)
Round 2: 4ch (counts as 1dc, 3ch), *1dc in next st, 3ch; repeat from * to last st, 1dc in last st, 1ch, 1htr in 1st ch from start (forming the last 3ch-sp). (15 3ch-sps)
Round 3: 6ch (counts as 1dc, 5ch), *1dc in next 3ch-sp, 5ch; repeat from * to last 3ch-sp, 1dc in last 3ch-sp, 2ch, 1tr in 1st ch from start (forming the last 5ch-sp). (15 5ch-sps)
Round 4: 6ch (counts as 1dc, 5ch), *1dc in next 5ch-sp, 5ch; repeat from * to end of round join to 1st ch from start with a ss. Break yarn and fasten off.
To construct the flower, make 3 different sized motifs in different colours.
One using the first 2 rounds (I used Heath).
One using the first 3 rounds (I used Pastel green).
One using all 4 rounds (I used Sea green).
Place the motifs on top of each other, place the Dorset button on top of all 3 and sew together. Then sew to the bag. And voila – the bag is made!
Zingy spring lifter
Of course, you could personalise your bag in any way you like, add a lining, lengthen or shorten the handles, add buttons, flowers – anything! Whatever you do, please show me what you make on my Ravelry forum.
This week I’m going to show you how to turn the motifs into the bag shape. Here’s a reminder of the bag, so you know the shape you are aiming for:
Zingy spring lifter
First you need to block them. If you leave it until you finish the bag you may find it a bit tricky.
Then you need to decide how you are going to join them. I recommend joining in one of these 4 ways:
By slip stitch holding the motifs right sides together, as I did for the Christmas CAL here.
By double crochet (US single crochet) holding the motifs wrong sides together.
By sewing.
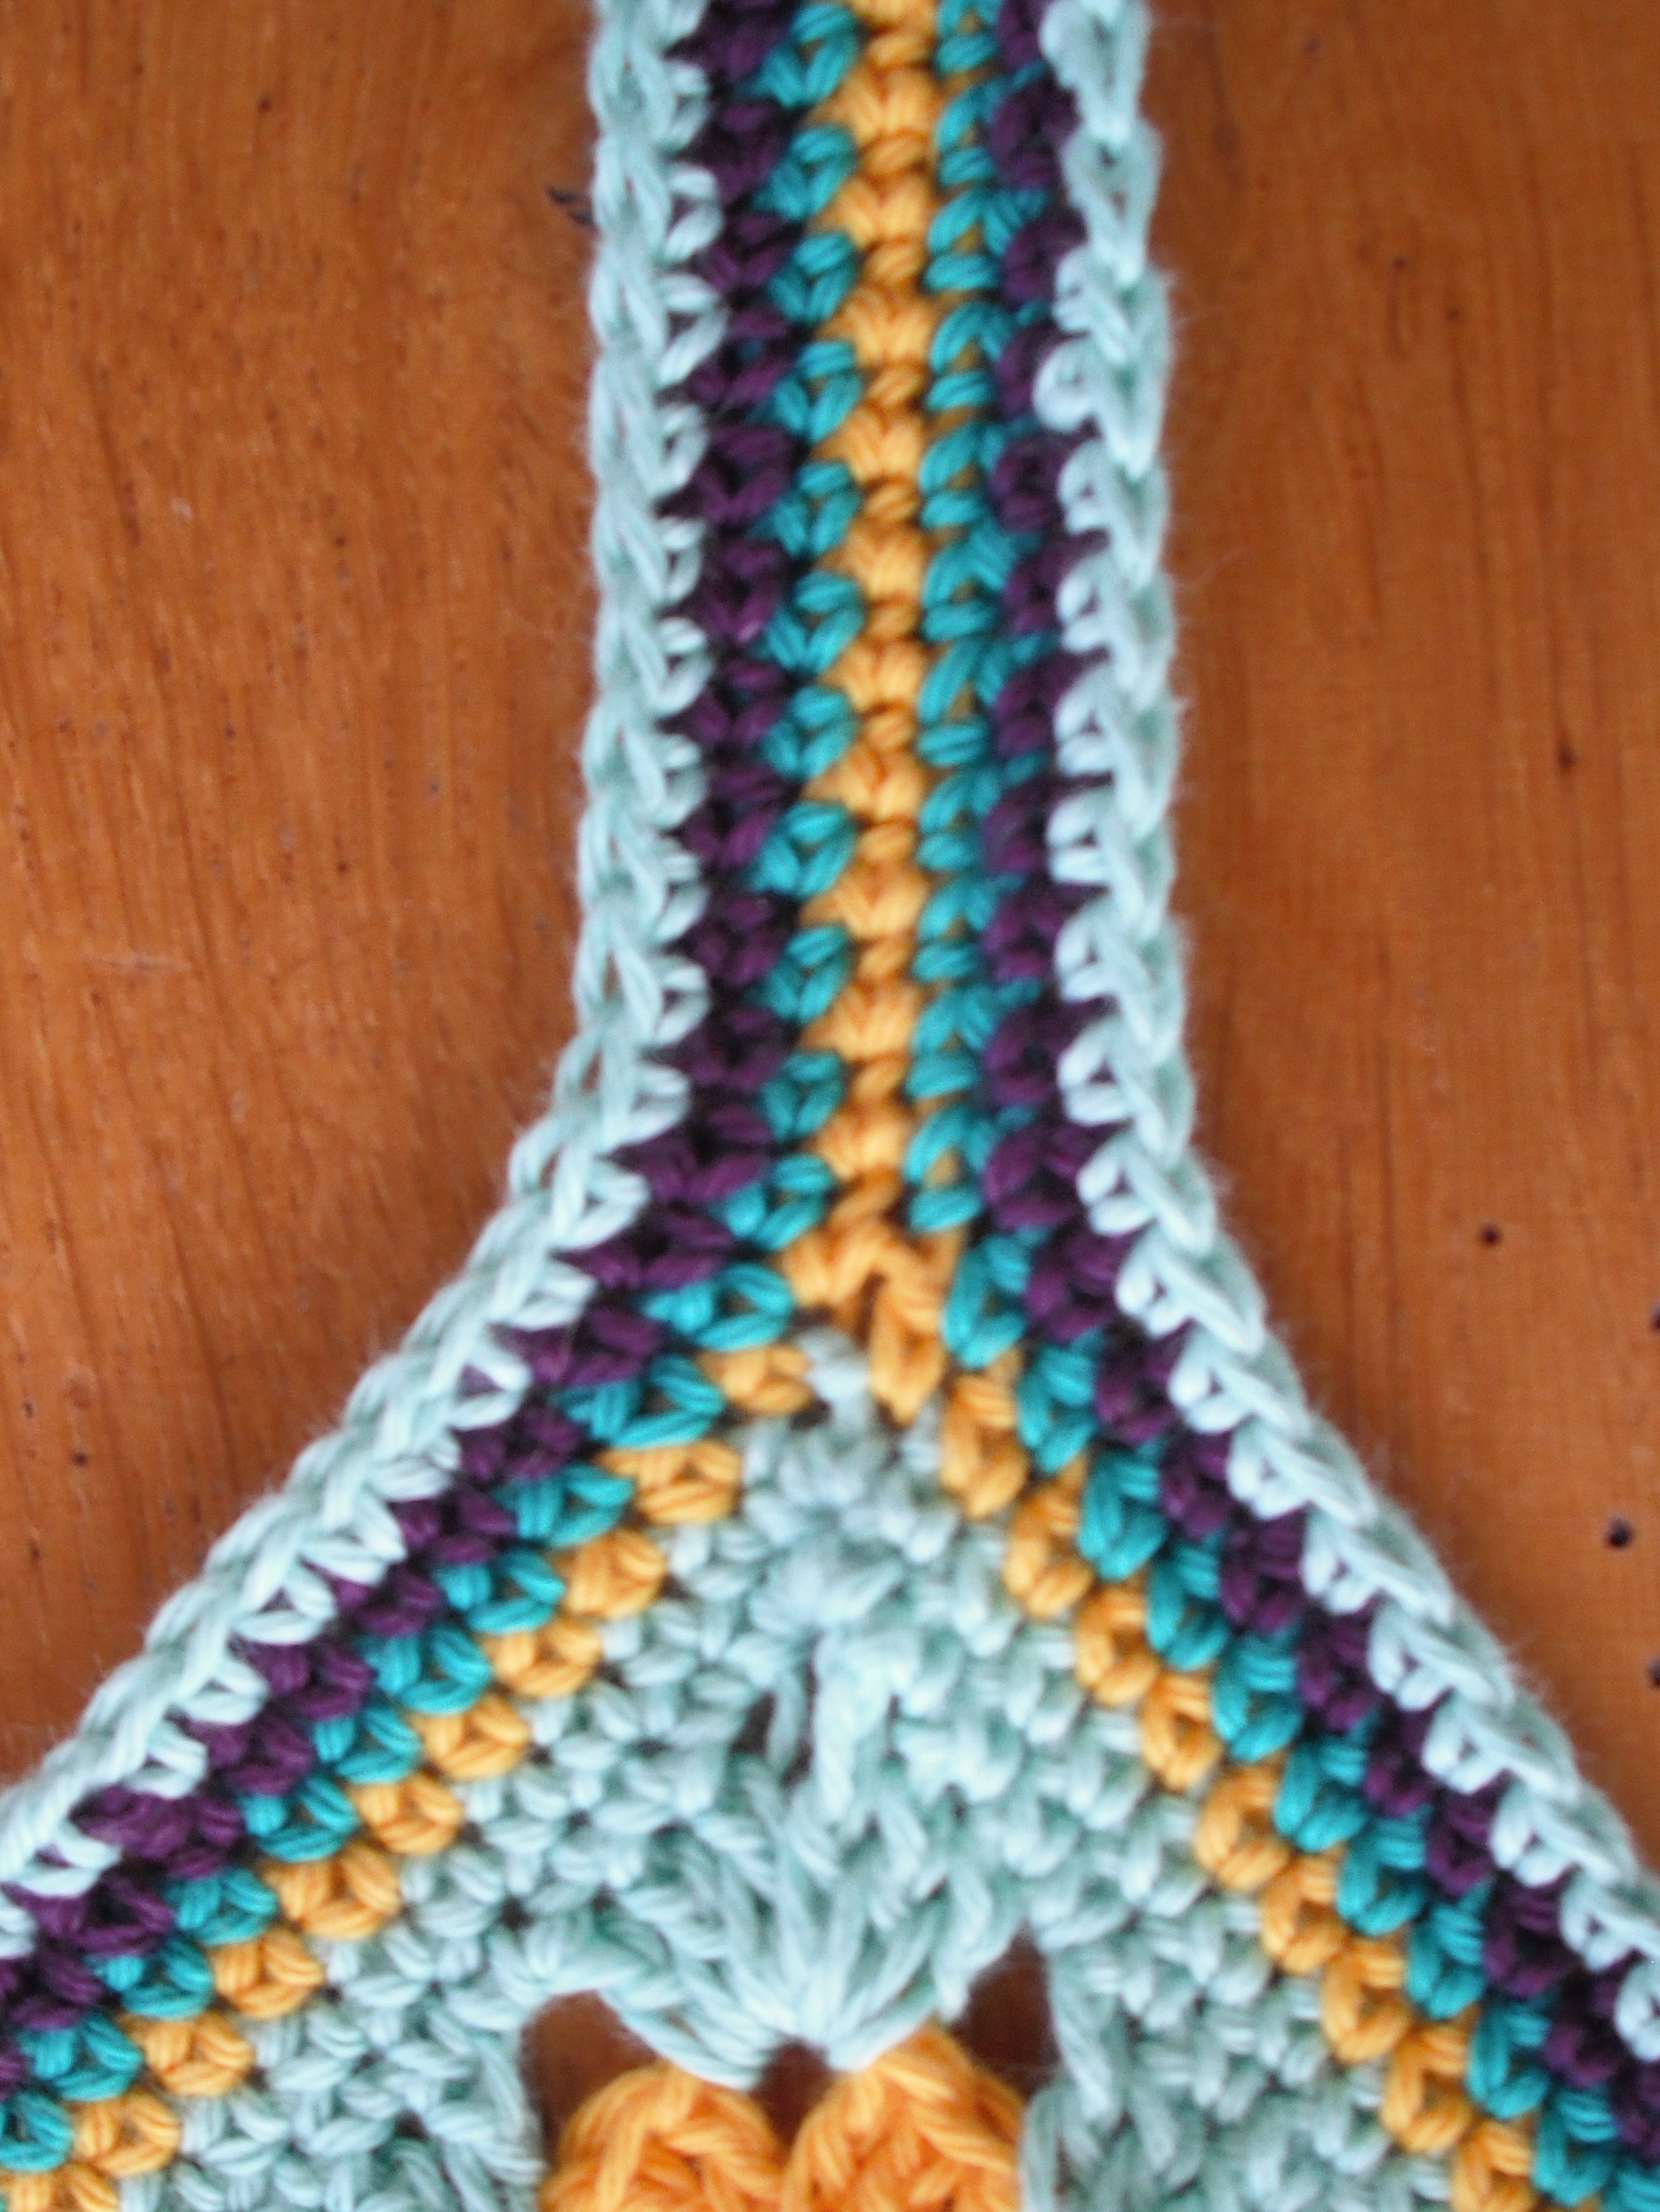
By slip stitch holding the motifs side by side, this is the method I used and I worked into the back stitch only. You may find this a bit tricky if you haven’t done it before, but I think it gives a good effect and is worth that extra effort. This shows you the technique:
Slip stitch side by side back loops only
And the finish:
Joined
I joined my bag using the same yarn that I used for the last round of my motifs – the Pastel Green.
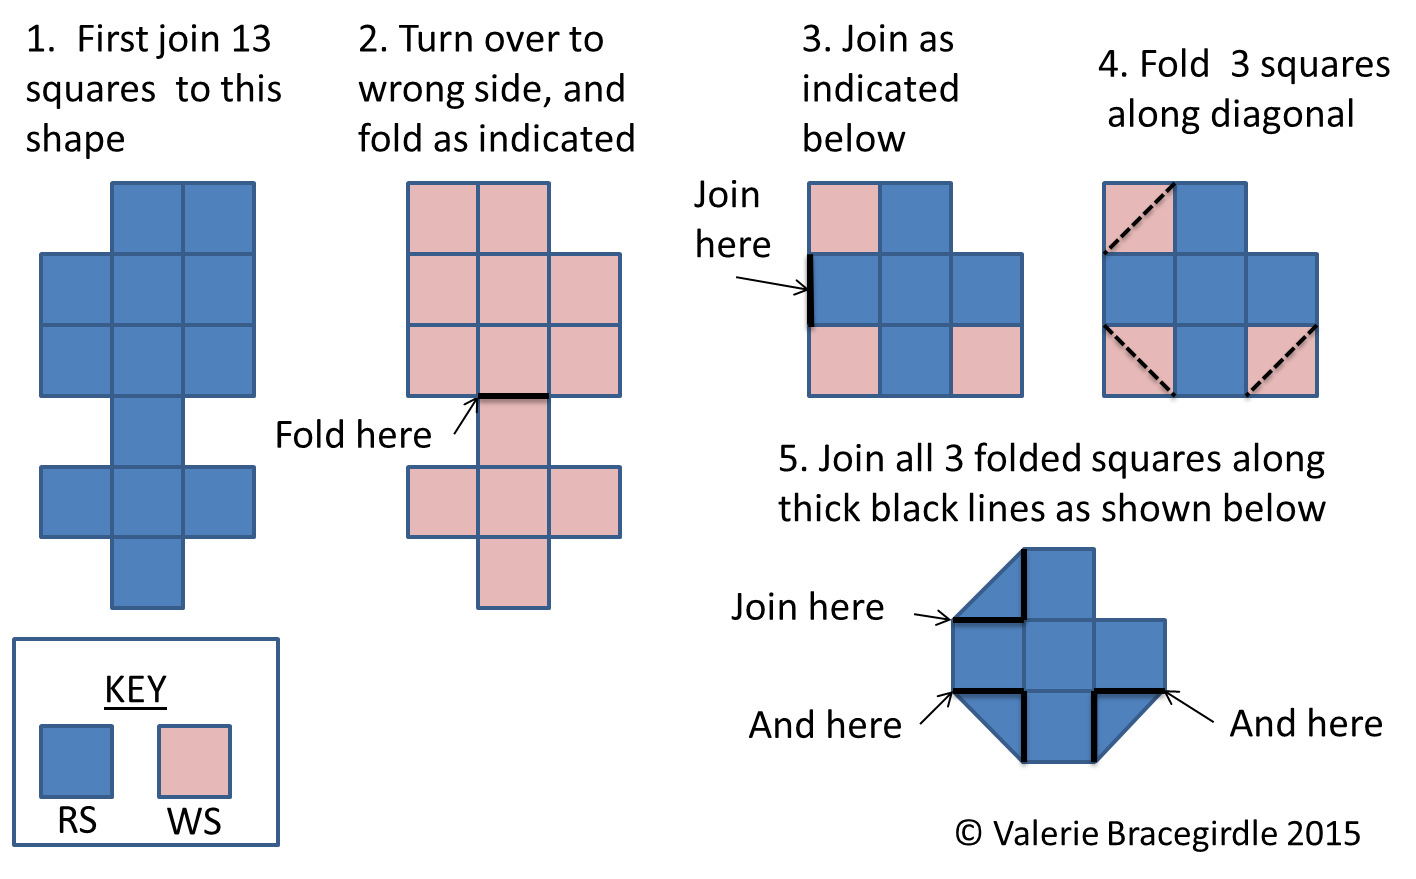
To form the bag shape you need to join them in a particular order. And I have illustrated this in the following diagrams:
Granny Tote Joining
It will take a while for you to make you bag shape, and you may find the last bits a little tricky. So I will share how to finish your bag next week.
Keep posting progress and asking questions on my Ravelry forum.
I’m going to make this CAL relaxed and slow – so you will get 3 weekly instalments and, hopefully, will have plenty of time each week to complete the instalment.
At the end of 3 weeks you should have a lovely bag like this
Ok – are you ready to start?
You will need 13 Granny Squares each about 15cm/6″ square. I used a traditional granny square and the pattern I use is written below – but you may use whatever granny pattern you like. Using my pattern and 4ply cotton yarn and a 3mm hook I ended up with 7 rounds (just a little smaller than 15cm/6”).
If you are using different weight of yarn you may wish to do fewer or more rounds and, of course, you may choose any colour scheme you want.
A quick reminder of my yarn colours: A is Heath (deep purple), B is Sea Green, C is Canary (yellow) and D is Light Pastel Green.
ABBREVIATIONS
The pattern is written in English crochet terms.
St = stitch
Ch = chain
Tr = treble (US dc)
Ss = slip stitch
Sp = space
Ch-sp =chain space
7 round granny square
Foundation: Using Yarn A, make a 4ch foundation ch and join into a ring with a ss Round 1: 5ch (counts as 1tr, 2ch), (3tr, 2ch) 3 times into the ring, 2tr into the ring, join to 3rd st of starting 5ch with a ss. Round 2: ss into 2ch-sp, (note for this and each subsequent round: this ss is to position the start of the round in the right place) 5ch (counts as 1tr, 2ch), (3tr, 1ch) into the same 2ch-sp, (3tr, 2ch, 3tr, 1ch) into each of the next three 2ch-sps, 2tr into the first 2ch-sp, join to 3rd st of starting 5ch with a ss. Break yarn and fasten off. Round 3: Using Yarn B, ss into 2ch-sp, 5ch (counts as 1tr, 2ch), (3tr, 1ch) into the same 2ch-sp, *(3tr, 1ch) into the next 1ch-sp, (3tr, 2ch, 3tr, 1ch) into the next 2ch-sp; repeat from * another 2 times (3tr, 1ch) into the next 1ch-sp, 2tr into the first 2ch-sp, join to 3rd st of starting 5ch with a ss. Round 4: ss into 2ch-sp, 5ch (counts as 1tr, 2ch), (3tr, 1ch) into the same 2ch-sp, *(3tr, 1ch) into each of the next two 1ch-sps, (3tr, 2ch, 3tr, 1ch) into the next 2ch-sp; repeat from * another 2 times (3tr, 1ch) into each of the next two 1ch-sps, 2tr in the first 2ch-sp, join to 3rd st of starting 5ch with a ss. Break yarn and fasten off. Round 5: Using Yarn C, ss into 2ch-sp, 5ch (counts as 1tr, 2ch), (3tr, 1ch) into the same 2ch-sp, *(3tr, 1ch) into each of the next three 1ch-sps, (3tr, 2ch, 3tr, 1ch) into the next 2ch-sp; repeat from * another 2 times (3tr, 1ch) into each of the next three 1ch-sps, 2tr into the 1st 2ch-sp, join to 3rd st of starting 5ch with a ss. Round 6: ss into 2ch-sp, 5ch (counts as 1tr, 2ch), (3tr, 1ch) into the same 2ch-sp, *(3tr, 1ch) into each of the next four 1ch-sps, (3tr, 2ch, 3tr, 1ch) into the next 2ch-sp; repeat from * another 2 times (3tr, 1ch) into each of the next four 1ch-sps, 2tr into the 1st 2ch-sp, join to 3rd st of starting 5ch with a ss. Break yarn and fasten off. Round 7: Using Yarn D, ss into 2ch-sp, 5ch (counts as 1tr, 2ch), (3tr, 1ch) into the same 2ch-sp, *(3tr, 1ch) into each of the next five 1ch-sps, (3tr, 2ch, 3tr, 1ch) into the next 2ch-sp; repeat from * another 2 times (3tr, 1ch) into each of the next five 1ch-sps, 2tr into the 1st 2ch-sp, join to 3rd st of starting 5ch with a ss. Break yarn and fasten off, leaving a long tail of about 3m for sewing or crocheting together later.
Tune in for the next stage, which I’ll publish in a week.
I have a discussion thread on my Ravelry Group here. Please join in and share your progress.
It is in zingy colours and is lifting my mood, making me think of Spring even though we are still in Winter here in the UK. I have seen similar bags but never attempted to design one like this before, it was easier than I imagined it would be! So I thought you might like me to share how I made this with you.
I will be posting 3 blogs on the ‘how to’.
If you want to join in you may wish to start gathering your equipment now.
I made my ‘spring lifter’ in a 4ply/fingering weight cotton in a chosen colour scheme. However this can be made in any yarn weight and would be a fabulous stash buster. Remember if you use a different yarn weight you should use a suitable hook size.
So here is what I used:
YARN
Scheepjes Cotton 8, 50g/170m/186yds per ball. I used 4 colours:
A – 1 ball of Heath (721) – a deep purple
B – 1 ball of Sea Green (723)
C – 2 balls of Canary (714) but I used only about 5m/yd of the second ball
D – 1 ball of Light Pastel Green (663)
HOOK
3mm crochet hook (US D/3)
OTHER
4 lockable stitch markers
Tapestry needle for sewing ends
Ring for Dorset button (optional) for the centre of my simple flower.
Start gathering your equipment and I’ll post part 1 of the ‘how to’ tomorrow.
Meanwhile, I have started a discussion on my Ravelry forum here, if you want to join in this CAL please join in the discussion too. I’d love to see what you make.
I’m embarking on a new project, something using the traditional granny square.
New granny
I am using some cotton 4 ply/fingering weight yarn which I haven’t used before – Scheepjes Cotton 8. It is lovely to work with and when I started to use it I got carried away with just making some grannies, they fly off my hook! So I have a little production line going:
Grannies growing
What am I making? You’ll just have to wait and see!
A crochet blog where you will find free crochet patterns along with oodles of crochet inspiration. Featured in top 100 crochet blogs and also in Crochet Now Magazine