Blog Blanket CAL – Square no 2

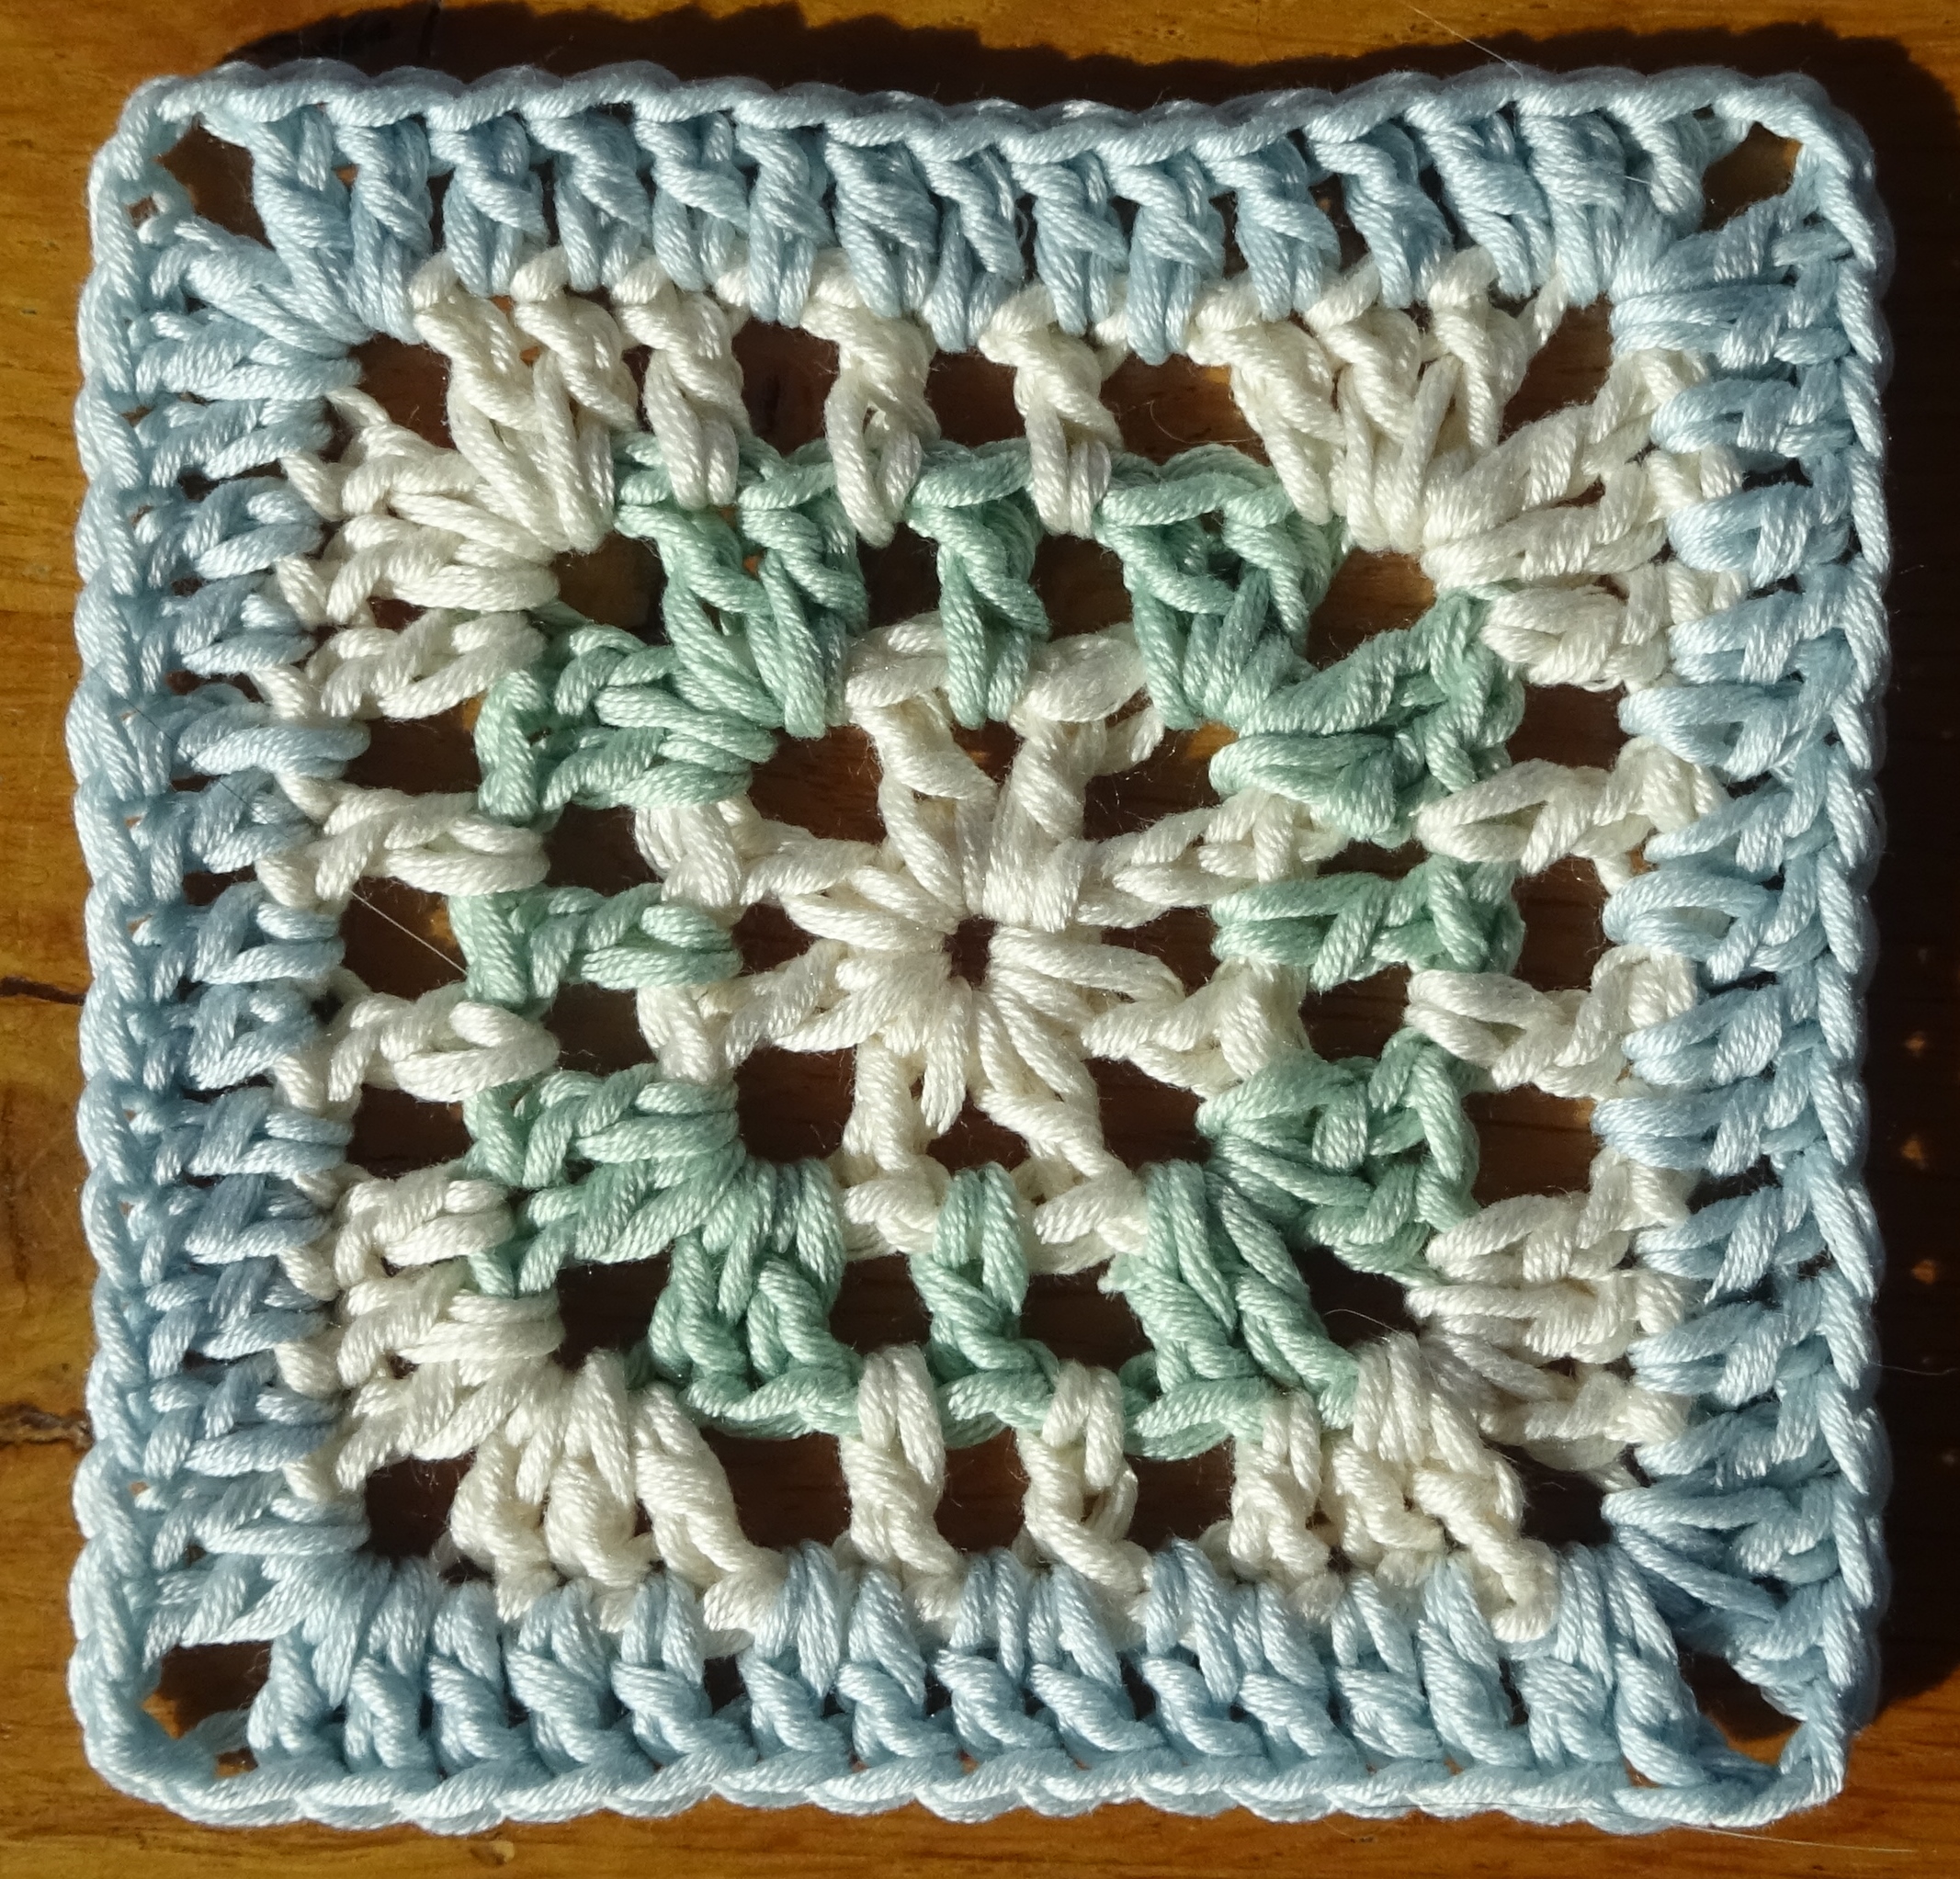
A week has passed since I published the first square and I know some of you have already made plenty of them in varying colour schemes.   So I know you are ready for number 2 – here it is:

Number 2
Number 2

This is all one colour, but I have made another in pastel colours so you can see what each round looks like a little more clearly:

Number 2 in pastels
Number 2 in pastels

A reminder of the ABBREVIATIONS
The pattern is written in English crochet terms.
St = stitch
Ch = chain
Tr = treble (US dc)
Ss = slip stitch
Sp = space
Ch-sp =chain space

Foundation:  Make a 4ch foundation ch and join into a ring with a ss

Round 1: 5ch (counts as 1tr, 2ch), (1tr, 1ch, 1tr, 2ch) 3 times into the ring, (1tr, 1ch) into the ring, join to 3rd st of starting 5ch with a ss.

Round 2: ss into 2ch-sp, (note for this and each subsequent round: this ss is to position the start of the round in the right place) 5ch (counts as 1tr, 2ch), (2tr, 1ch) into the same 2ch-sp, *(1tr, 1ch) into next 1ch-sp, (2tr, 2ch, 2tr, 1ch) into the next 2ch-sp; repeat from * another 2 times,  (1tr, 1ch) into next 1ch-sp, 1tr into first 2ch-sp, join to 3rd st of starting 5ch with a ss.

Round 3: ss into 2ch-sp, 5ch (counts as 1tr, 2ch), 2tr into the same 2ch-sp, *(1tr, 1ch) in next st, (1tr, 1ch) in each of next two 1ch-sps, miss 1 st, 1tr in next st**, (2tr, 2ch, 2tr) in next 2ch-sp; repeat from * another 3 times but on the last repeat finish at **, 1tr into the first 2ch-sp, join to 3rd st of starting 5ch with a ss.

Round 4: ss into 2ch-sp, 5ch (counts as 1tr, 2ch), 2tr into the same 2ch-sp, 1tr into each st and 1ch-sp around, (2tr, 2ch, 2tr) into each 2ch-sp, and work a final 1tr into the first 2ch-sp,  join to 3rd st of starting 5ch with a ss.

Break yarn and fasten off, leaving a long tail of about 3m for sewing or crocheting together later.

You should have 15tr along each side and a 2ch-sp at each corner.

Make as many as you like of these but I made a total of 16, 1 each in Purple Mix and Olive Mix, 2 each in Forget-me-not and Orange Mix, 3 each in Blue and Red and 4 in Goldenrod.

Please join in the discussion and share your progress on my Ravelry forum here.

And tune in next week for square number 3.

Happy crocheting xx


Blog Blanket CAL 2015

Last week I posted a few photos from the Christmas Blanket CAL with a hint of a new CAL to come.   Today I am launching that CAL.

This is the Blog Blanket CAL 2015, and I’m launching it now because I know some people have decided to have a ‘stash down’ for Lent, using yarn in their stash for the whole of Lent.   This blanket is a great stash buster, if you join in you will find that your stash diminishes quickly – freeing up space in your yarn cupboard for when you next go shopping!

So what type of blanket is it?

It’s made of square motifs, variations on the granny square.    If you can make a granny square then you can make this blanket and if you are an experienced crocheter you will find it a quick and relaxing make.  (If you want something challenging, then maybe this isn’t for you.)

There are no complicated stitches – it uses chain, treble (US double crochet) and slip stitch, and for the border maybe a few other stitches like double crochet and half treble.

There are 6 styles of square – each will be published at weekly intervals.  You can use as many of the styles as you like.

I am making mine in one colour per square, but you can use lots of colours if you like.

I will publish 2 types of layout towards the end of the CAL, but you can follow any layout you like and make it as big or small as you like.

I am using aran weight yarn but you can use any yarn provided you use a suitable hook size.

The finished size of mine will be about 1.2m (4ft) square but I haven’t decided what I will be doing for the border yet, so it may be a bit bigger.

This is what I am using:

Yummy yarn!
Yummy yarn!

For the main blanket I am using 21 balls of Drops Nepal, 75% wool/25% alpaca, 50g/75m per ball in 7 different colours.  The border will need more yarn – maybe another 3 balls.

And I am using a 4.5mm crochet hook.

Next week I will publish the first square, I hope this gives you enough time to gather your thoughts and your stash!

Happy crocheting xxx

Hooking Up! feature no 5

This is the fifth design in the Hooking Up! ebook.

It is included in the book by special permission of the designer Amanda Perkins.  You can read all about Amanda on her blog, she creates the most beautiful crochet designs and has a brilliant eye for colour.  I am proud to call her my friend and I am probably one of her biggest fans!

This design is the Cassia Cowl.

Cassia
Cassia

The photograph is the cowl I made for the ebook.  I used a different yarn to the one Amanda used originally, to show that it is adaptable and because I wanted to!  It is made with motifs that are joined as you go.  If you have followed the ebook through you will understand how to join as you go by the time you reach this pattern.   I love working with motifs, especially those that are hexagonal (six-sided or six-pointed) and this one is straightforward to make yet looks so beautiful.

This is a Mobius Cowl, so it needs careful attention when joining into the cowl shape.  The ebook provides detailed instructions of 2 ways in which you can do this.

This is not exclusive to the ebook, you can buy Amanda’s individual pattern here.

Tomorrow I will share the last design in the ebook, another by Amanda Perkins.

Happy crocheting xxx


Hooking Up! feature no 3

This is the third design in the Hooking Up! ebook – the Round and Round Cowl.

Round and Round Cowl

I love cowls, I find them better than scarves if I am out and about because they stay where you put them – around your neck!   There is nothing more frustrating than having your scarf fall off or worse still trip you up.  A bonus for a crocheter or knitter is that they use less yarn and are quicker to make than most scarves.

This design is exclusive to the ebook; you will not find it elsewhere.  I added it because it is a good one to learn how to make things in the round.  It is made using a Bulky yarn (Rowan Cocoon) which means you have less stitches to deal with when you are starting off, perfect for your first project in the round.

There are charts included with this design, as with the other designs in the ebook, but they are not compulsory.  If you want to learn how to read a chart then the one with the Simple Scarf will help you get started.  But if you don’t like charts, just ignore them!

Happy crocheting xxx


Hooking Up! feature no 2

The second design in the Hooking Up! ebook is the April Scarf.

April Scarf
April Scarf

This was published in April 2014 as part of my 2014 scarf a month challenge.   But I decided it is also a good fit in the ebook.   The Simple Scarf uses a dk/worsted weight yarn but this April Scarf moves onto a 4ply/fingering yarn and, although not compulsory as you can use any weight of yarn, practice with finer yarns is an important step if you want to increase your crochet repertoire. It will stretch the new crocheter a little, giving them a couple more stitches to use and some interesting challenges about placing stitches.   So completing this should be a real confidence booster!

If you try this pattern, or any in the ebook, and find you have any difficulties then please do join the Ravelry forum here and ask questions – I will be happy to answer them but also you will find there are plenty of helpful crocheters on the forum.


Happy crocheting xxx

Hooking Up!

This week I published a new ebook: Hooking Up!
This ebook contains 6 patterns that are ideal for those who have just learnt to crochet as well as experienced crocheters.

Hooking Up!
Hooking Up!

If you are new to crochet then you will gain experience and learn new techniques as you work through the 6 designs. The book also provides good reference material – a reminder of the stitches used, the importance of tension and how to adjust your hook size, what to have in your beginner crochet kit, all about blocking and lots of other useful reference material.
If you are experienced at crochet then you will find some beautiful projects which you can make quickly and adapt to your requirements.

Over the next week I will be featuring each pattern in turn. Today it is Simple Scarf.

Simple Scarf
Simple Scarf

I designed this especially for some gorgeous silk yarn by Willow Knits and I used 5 mini skeins. However, it is adaptable and can be used with any type of yarn – ideas on how to adapt are provided in the ebook. Here is one I made using a single ball of Rowan Kidsilk Haze:

Simple Kidsilk Scarf

If you make a mistake counting your foundation chain on this pattern then you will find a cure – I provide instructions on how to work with this little mistake without having to take back your work; a simple scarf with simple solutions!

The other patterns in the book are April Scarf, Round and Round Cowl, Granny Blue Lap/Baby Blanket and, by special permission, Cassia Cowl and Starry Night Blanket by Amanda Perkins. More information on these 5 patterns will feature in future blogs.

Happy crocheting xxx

Spring Lifter CAL part 2

This week I’m going to show you how to turn the motifs into the bag shape.  Here’s a reminder of the bag, so you know the shape you are aiming for:

Zingy spring lifter
Zingy spring lifter

First you need to block them.   If you leave it until you finish the bag you may find it a bit tricky.

Then you need to decide how you are going to join them.  I recommend joining in one of these 4 ways:

  1. By slip stitch holding the motifs right sides together, as I did for the Christmas CAL here.
  2. By double crochet (US single crochet) holding the motifs wrong sides together.
  3. By sewing.
  4. By slip stitch holding the motifs side by side, this is the method I used and I worked into the back stitch only.  You may find this a bit tricky if you haven’t done it before, but I think it gives a good effect and is worth that extra effort.  This shows you the technique:
Slip stitch side by side back loops only

And the finish:

Joined
Joined

I joined my bag using the same yarn that I used for the last round of my motifs – the Pastel Green.

To form the bag shape you need to join them in a particular order.  And I have illustrated this in the following diagrams:

Granny Tote Joining
Granny Tote Joining

It will take a while for you to make you bag shape, and you may find the last bits a little tricky.  So I will share how to finish your bag next week.

Keep posting progress and asking questions on my Ravelry forum.

Happy crocheting xx

Spring Lifter CAL part 1

I’m going to make this CAL relaxed and slow – so you will get 3 weekly instalments and, hopefully, will have plenty of time each week to complete the instalment.

At the end of 3 weeks you should have a lovely bag like this

Ok – are you ready to start?

You will need 13 Granny Squares each about 15cm/6″ square.  I used a traditional granny square and the pattern I use is written below – but you may use whatever granny pattern you like.  Using my pattern and 4ply cotton yarn and a 3mm hook I ended up with 7 rounds (just a little smaller than 15cm/6”).

If you are using different weight of yarn you may wish to do fewer or more rounds and, of course, you may choose any colour scheme you want.

A quick reminder of my yarn colours: A is Heath (deep purple), B is Sea Green, C is Canary (yellow) and D is Light Pastel Green.

ABBREVIATIONS
The pattern is written in English crochet terms.
St = stitch
Ch = chain
Tr = treble (US dc)
Ss = slip stitch
Sp = space
Ch-sp =chain space

7 round granny square

Foundation:  Using Yarn A, make a 4ch foundation ch and join into a ring with a ss
Round 1: 5ch (counts as 1tr, 2ch), (3tr, 2ch) 3 times into the ring, 2tr into the ring, join to 3rd st of starting 5ch with a ss.
Round 2: ss into 2ch-sp, (note for this and each subsequent round: this ss is to position the start of the round in the right place) 5ch (counts as 1tr, 2ch), (3tr, 1ch) into the same 2ch-sp, (3tr, 2ch, 3tr, 1ch) into each of the next three 2ch-sps, 2tr into the first 2ch-sp, join to 3rd st of starting 5ch with a ss. Break yarn and fasten off.
Round 3: Using Yarn B, ss into 2ch-sp, 5ch (counts as 1tr, 2ch), (3tr, 1ch) into the same 2ch-sp, *(3tr, 1ch) into the next 1ch-sp, (3tr, 2ch, 3tr, 1ch) into the next 2ch-sp; repeat from * another 2 times (3tr, 1ch) into the next 1ch-sp, 2tr into the first 2ch-sp, join to 3rd st of starting 5ch with a ss.
Round 4: ss into 2ch-sp, 5ch (counts as 1tr, 2ch), (3tr, 1ch) into the same 2ch-sp, *(3tr, 1ch) into each of the next two 1ch-sps, (3tr, 2ch, 3tr, 1ch) into the next 2ch-sp; repeat from * another 2 times (3tr, 1ch) into each of the next two 1ch-sps, 2tr in the first 2ch-sp, join to 3rd st of starting 5ch with a ss. Break yarn and fasten off.
Round 5: Using Yarn C, ss into 2ch-sp, 5ch (counts as 1tr, 2ch), (3tr, 1ch) into the same 2ch-sp, *(3tr, 1ch) into each of the next three 1ch-sps, (3tr, 2ch, 3tr, 1ch) into the next 2ch-sp; repeat from * another 2 times (3tr, 1ch) into each of the next three 1ch-sps, 2tr into the 1st 2ch-sp, join to 3rd st of starting 5ch with a ss.
Round 6: ss into 2ch-sp, 5ch (counts as 1tr, 2ch), (3tr, 1ch) into the same 2ch-sp, *(3tr, 1ch) into each of the next four 1ch-sps, (3tr, 2ch, 3tr, 1ch) into the next 2ch-sp; repeat from * another 2 times (3tr, 1ch) into each of the next four 1ch-sps, 2tr into the 1st 2ch-sp, join to 3rd st of starting 5ch with a ss.  Break yarn and fasten off.
Round 7: Using Yarn D, ss into 2ch-sp, 5ch (counts as 1tr, 2ch), (3tr, 1ch) into the same 2ch-sp, *(3tr, 1ch) into each of the next five 1ch-sps, (3tr, 2ch, 3tr, 1ch) into the next 2ch-sp; repeat from * another 2 times (3tr, 1ch) into each of the next five 1ch-sps, 2tr into the 1st 2ch-sp, join to 3rd st of starting 5ch with a ss. Break yarn and fasten off, leaving a long tail of about 3m for sewing or crocheting together later.

Tune in for the next stage, which I’ll publish in a week.

I have a discussion thread on my Ravelry Group here.   Please join in and share your progress.

Happy crocheting xx

My Spring Lifter!

Here is what I have been making this week:

Zingy spring lifter
Zingy spring lifter

It is in zingy colours and is lifting my mood, making me think of Spring even though we are still in Winter here in the UK.  I have seen similar bags but never attempted to design one like this before, it was easier than I imagined it would be!  So I thought you might like me to share how I made this with you.

I will be posting 3 blogs on the ‘how to’.

If you want to join in you may wish to start gathering your equipment now.

I made my ‘spring lifter’ in a 4ply/fingering weight cotton in a chosen colour scheme.  However this can be made in any yarn weight and would be a fabulous stash buster.  Remember if you use a different yarn weight you should use a suitable hook size.

So here is what I used:

YARN
Scheepjes Cotton 8, 50g/170m/186yds per ball.  I used 4 colours:
A – 1 ball of Heath (721) – a deep purple
B – 1 ball of Sea Green (723)
C – 2 balls of Canary (714) but I used only about 5m/yd of the second ball
D – 1 ball of Light Pastel Green (663)

HOOK
3mm crochet hook (US D/3)

OTHER
4 lockable stitch markers
Tapestry needle for sewing ends
Ring for Dorset button (optional) for the centre of my simple flower.

Start gathering your equipment and I’ll post part 1 of the ‘how to’ tomorrow.

Meanwhile, I have started a discussion on my Ravelry forum here, if you want to join in this CAL please join in the discussion too.  I’d love to see what you make.

Happy crocheting xx

Christmas CAL final part – THE BIG REVEAL!

Happy New Year!  I hope you celebrated the turn of the old year in suitable style.

Today is the big reveal!

First I will explain my edging.  I wanted something simple.  In fact when I had joined my motifs I liked the look of the blanket so much that I almost didn’t do an edging.  But not doing an edging is a crochet sin!  All blankets need something firm along the edge to hold the whole shape.

I experimented with several ideas and settled for the simplest.  I expect you think I did a double crochet edging, this is simple isn’t it?  Well I didn’t.  The simplest edging is slip stitch, and I did 2 rounds of slip stitch.

To maintain the same effect that I achieved with the joining of the motifs, the slip stitch edging was done into the back loop only.  This leaves the front loop of each motif to ‘frame’ the motif.  So the first edging round was done into the back loop of every stitch along the sides (that works out at 25 per motif edge).

Edging first round
Edging first round

Once you have completed the first round you will find the blanket has a nice firm edge.  Actually I think this simple round give a good finish, but I wanted a little more.

The second round went into the back loop of the first round.  When the second round is complete you’ll see that only the front loop of the first round is showing.  So choose your colours carefully as the second round is the predominant colour.

Edging second round
Edging second round

I didn’t do any extra stitches in the corners, I don’t think it necessary when it is just 2 rounds of slip stitch.  And it creates a gentle curve at the corner.

Edging corner
Edging corner


Nicely edged
Nicely edged

And this is the final blanket in it’s glory, being inspected by @yarnaddictcat :

@yarnaddictcat inspection

No little embellishment have been added (yet!).

If you look very closely you may notice that I didn’t quite follow the layout plan.  The colours are the same but the motifs are slightly off plan.  This is because, as I mentioned in part 4, I was running out of some colours so adjusted the order of motifs I made a little bit.

Now I’ve shown you mine – please show me yours!

Happy crocheting xxxx


Now for the legal stuff – I designed this, it’s all my own work and is copyright. Please feel free to make as many as you like, but not for commercial purposes, and please credit me with the design. Thank you!