BBC – the square that got away

Whenever I design anything I always swatch various ideas and some of them are changed or discarded altogether before I settle on a design.   This is not unusual, I am sure most, if not all, designers do something like this.

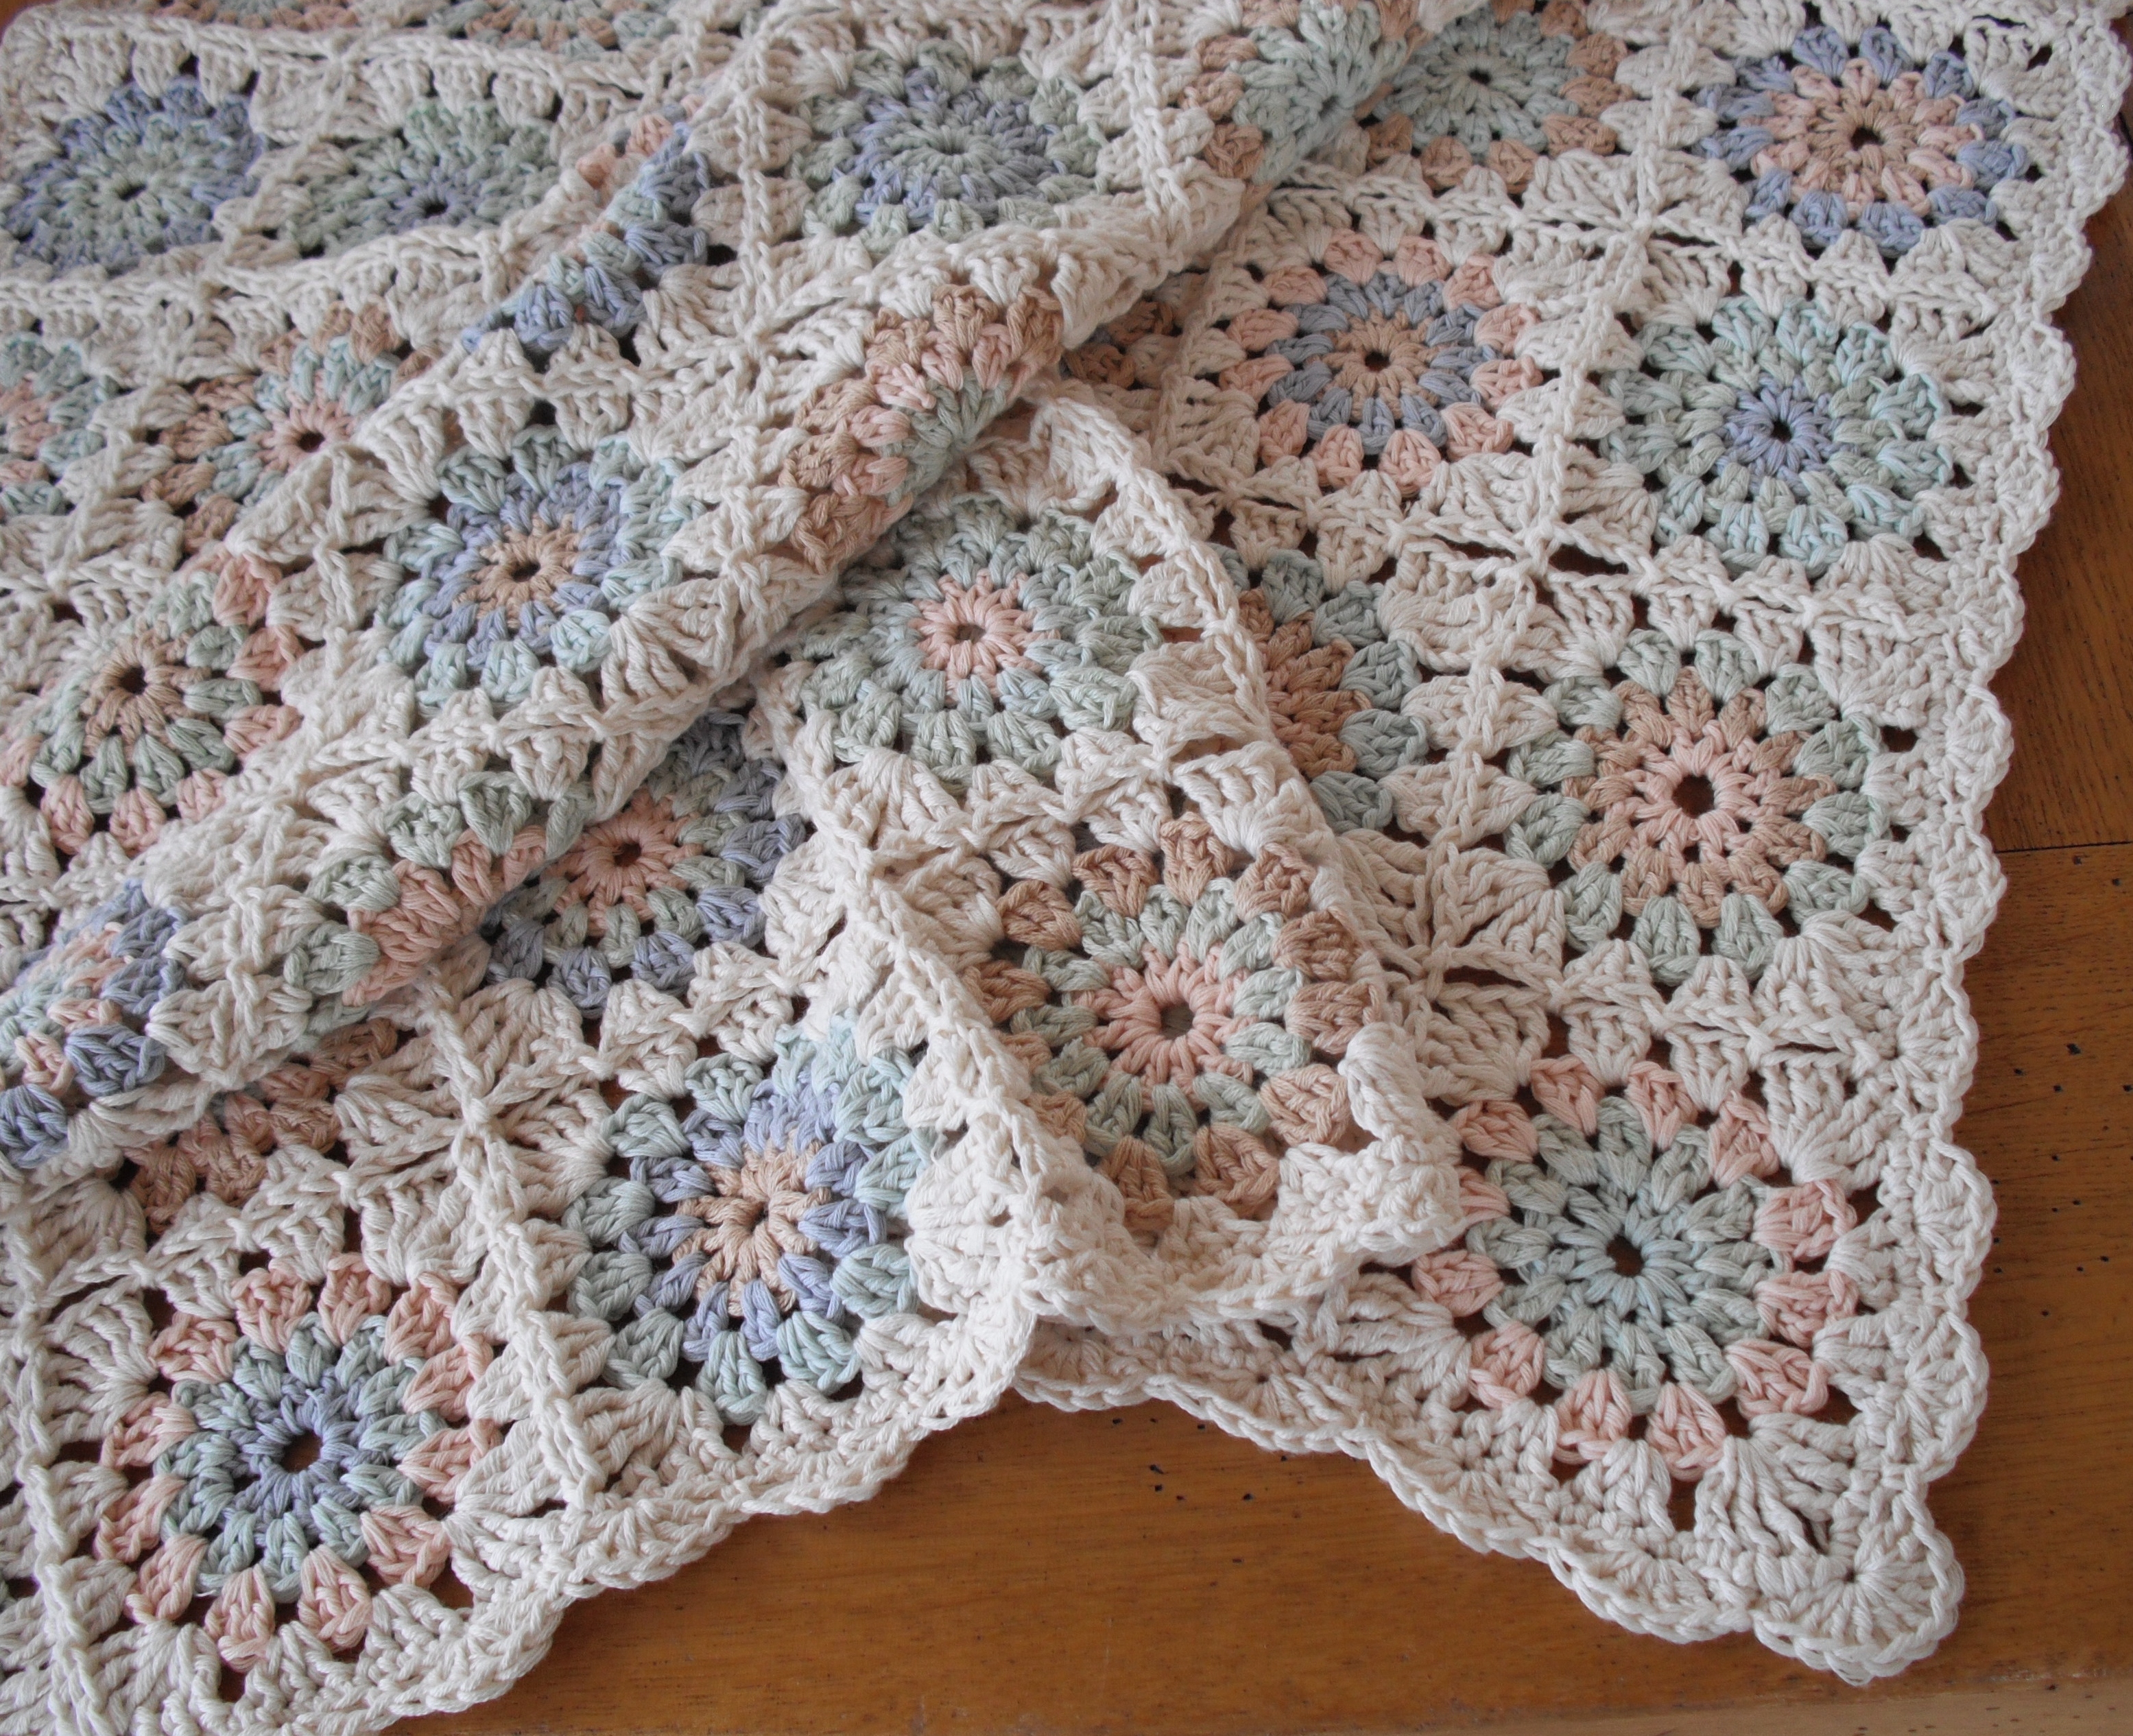
When designing the squares for the Blog Blanket CAL, I swatched one square which I decided wouldn’t be appropriate – I needed it to finish on a solid round and the 8 round version would end on a granny round.  But it wasn’t discarded, I liked it so I just put it aside waiting for some other use.

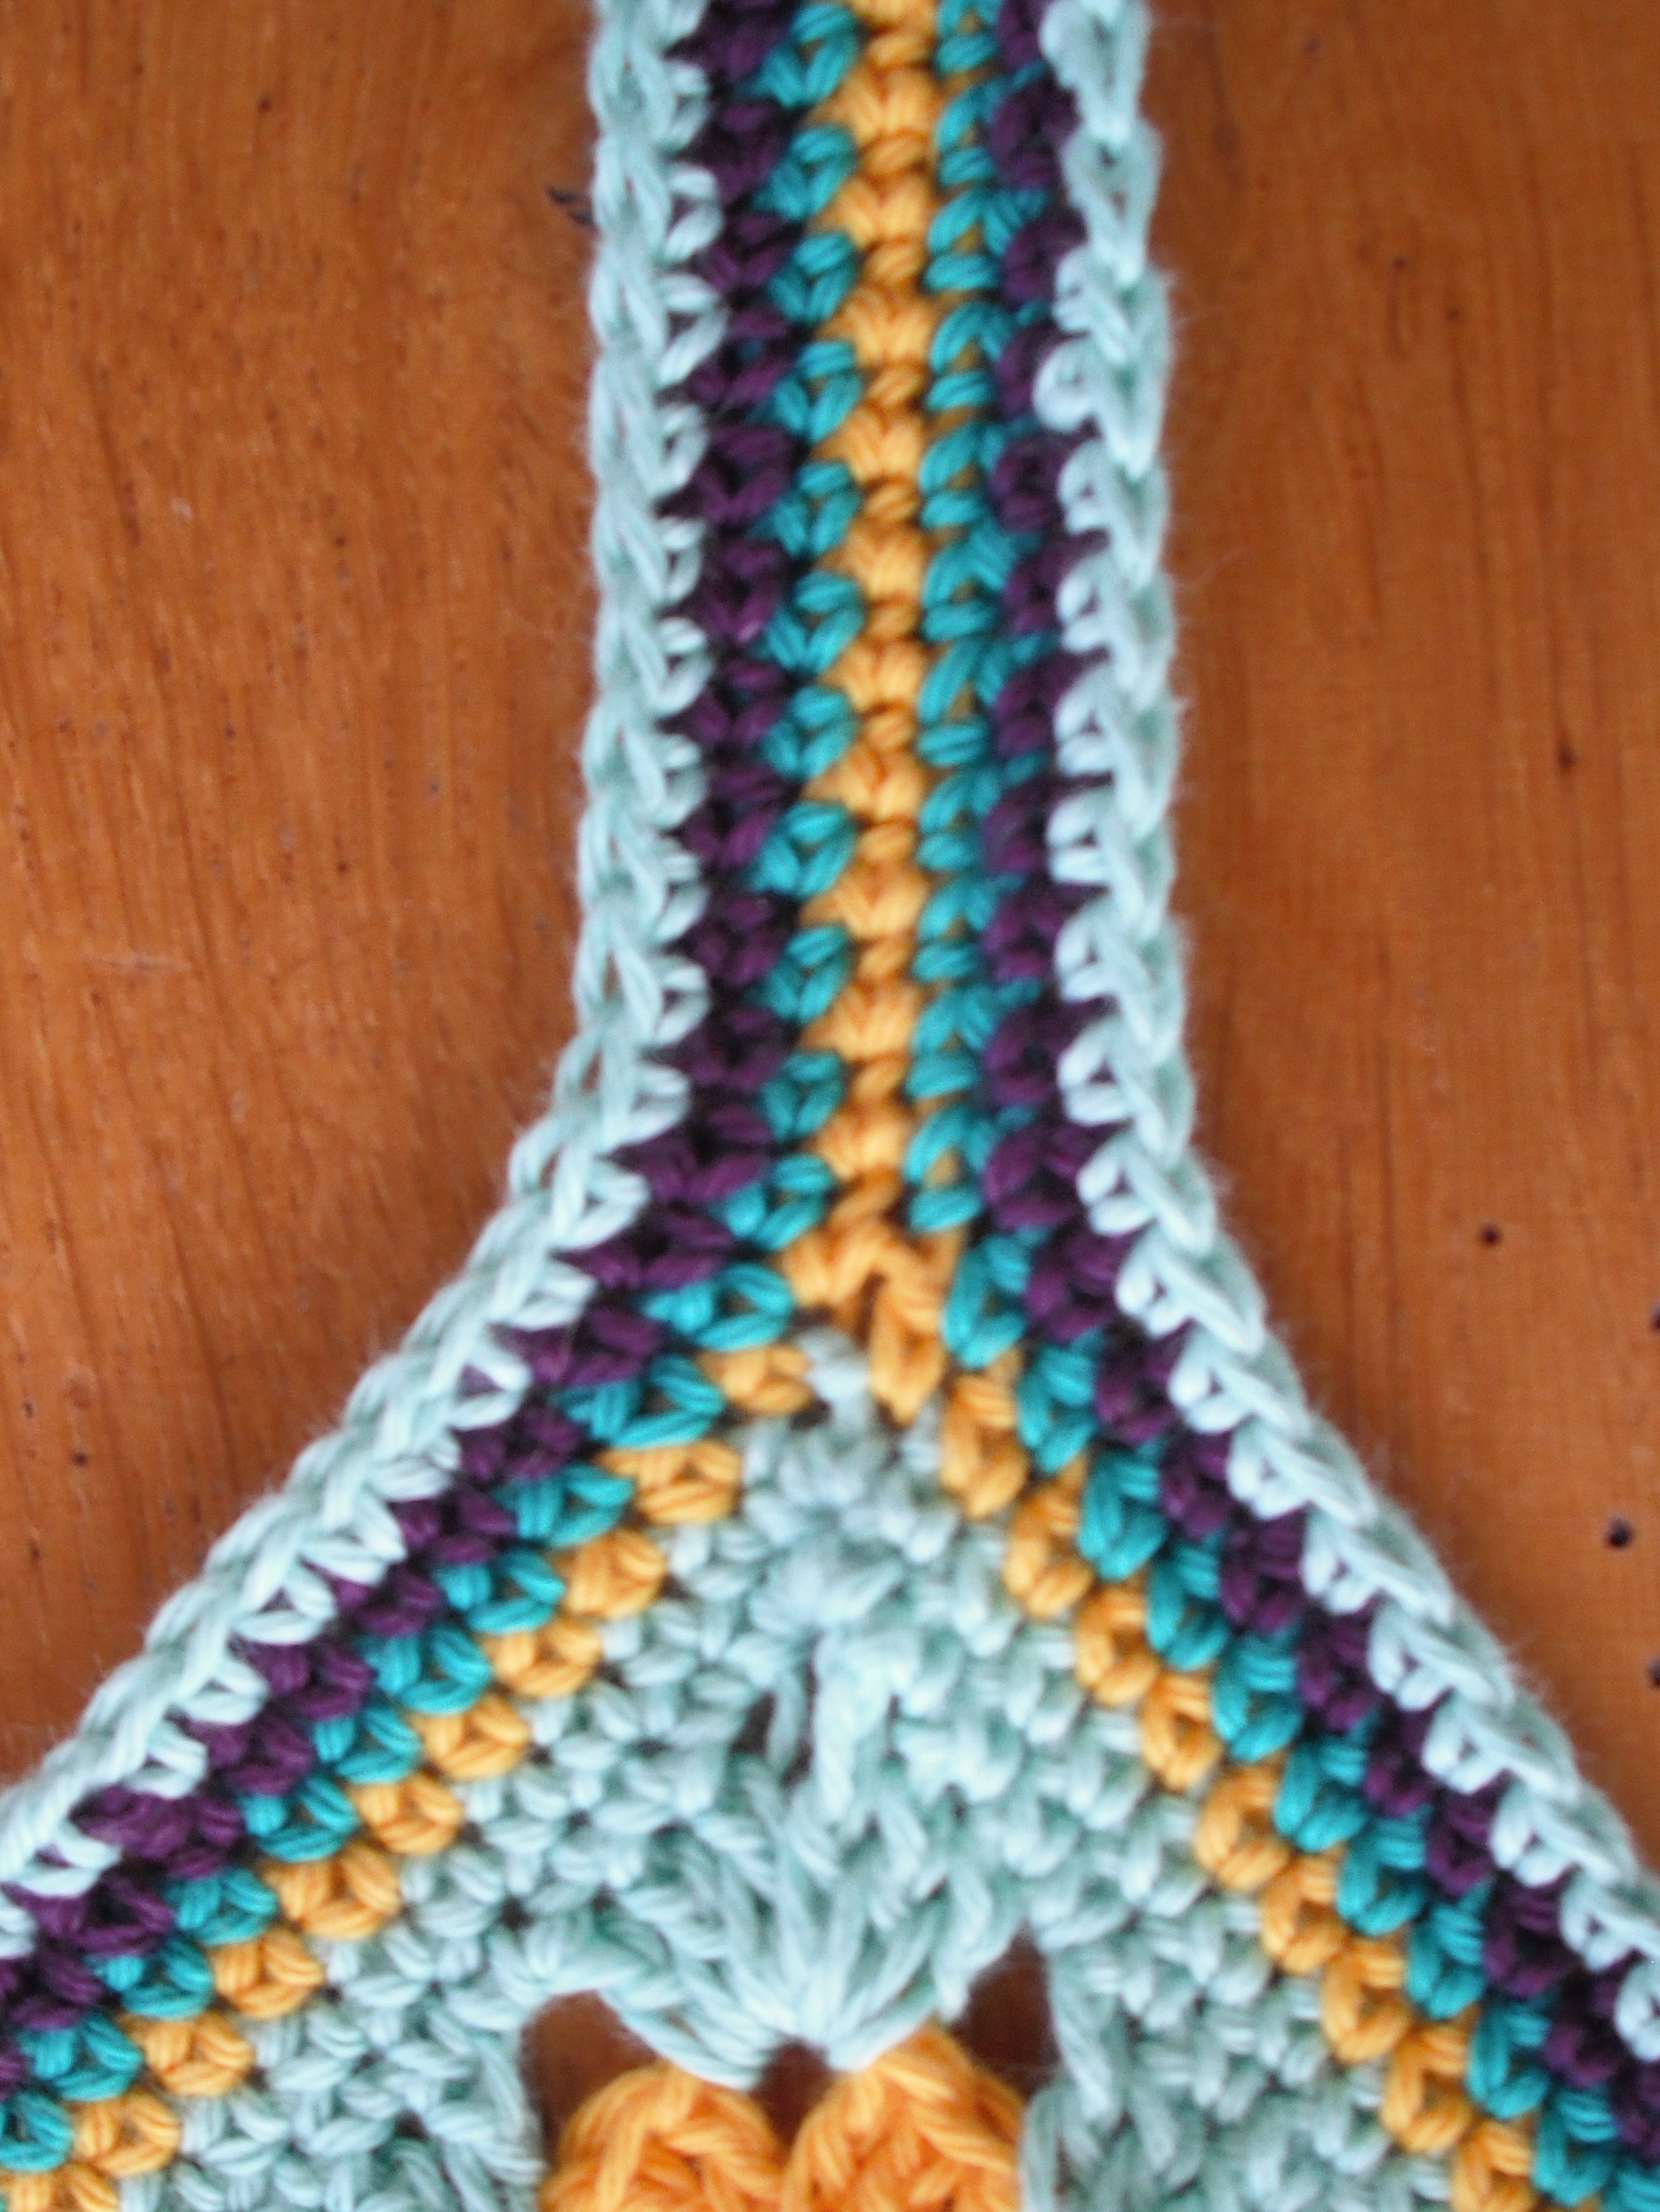
This is my original swatch and……………there’s an error in it, but I won’t tell you where!

The one that got away

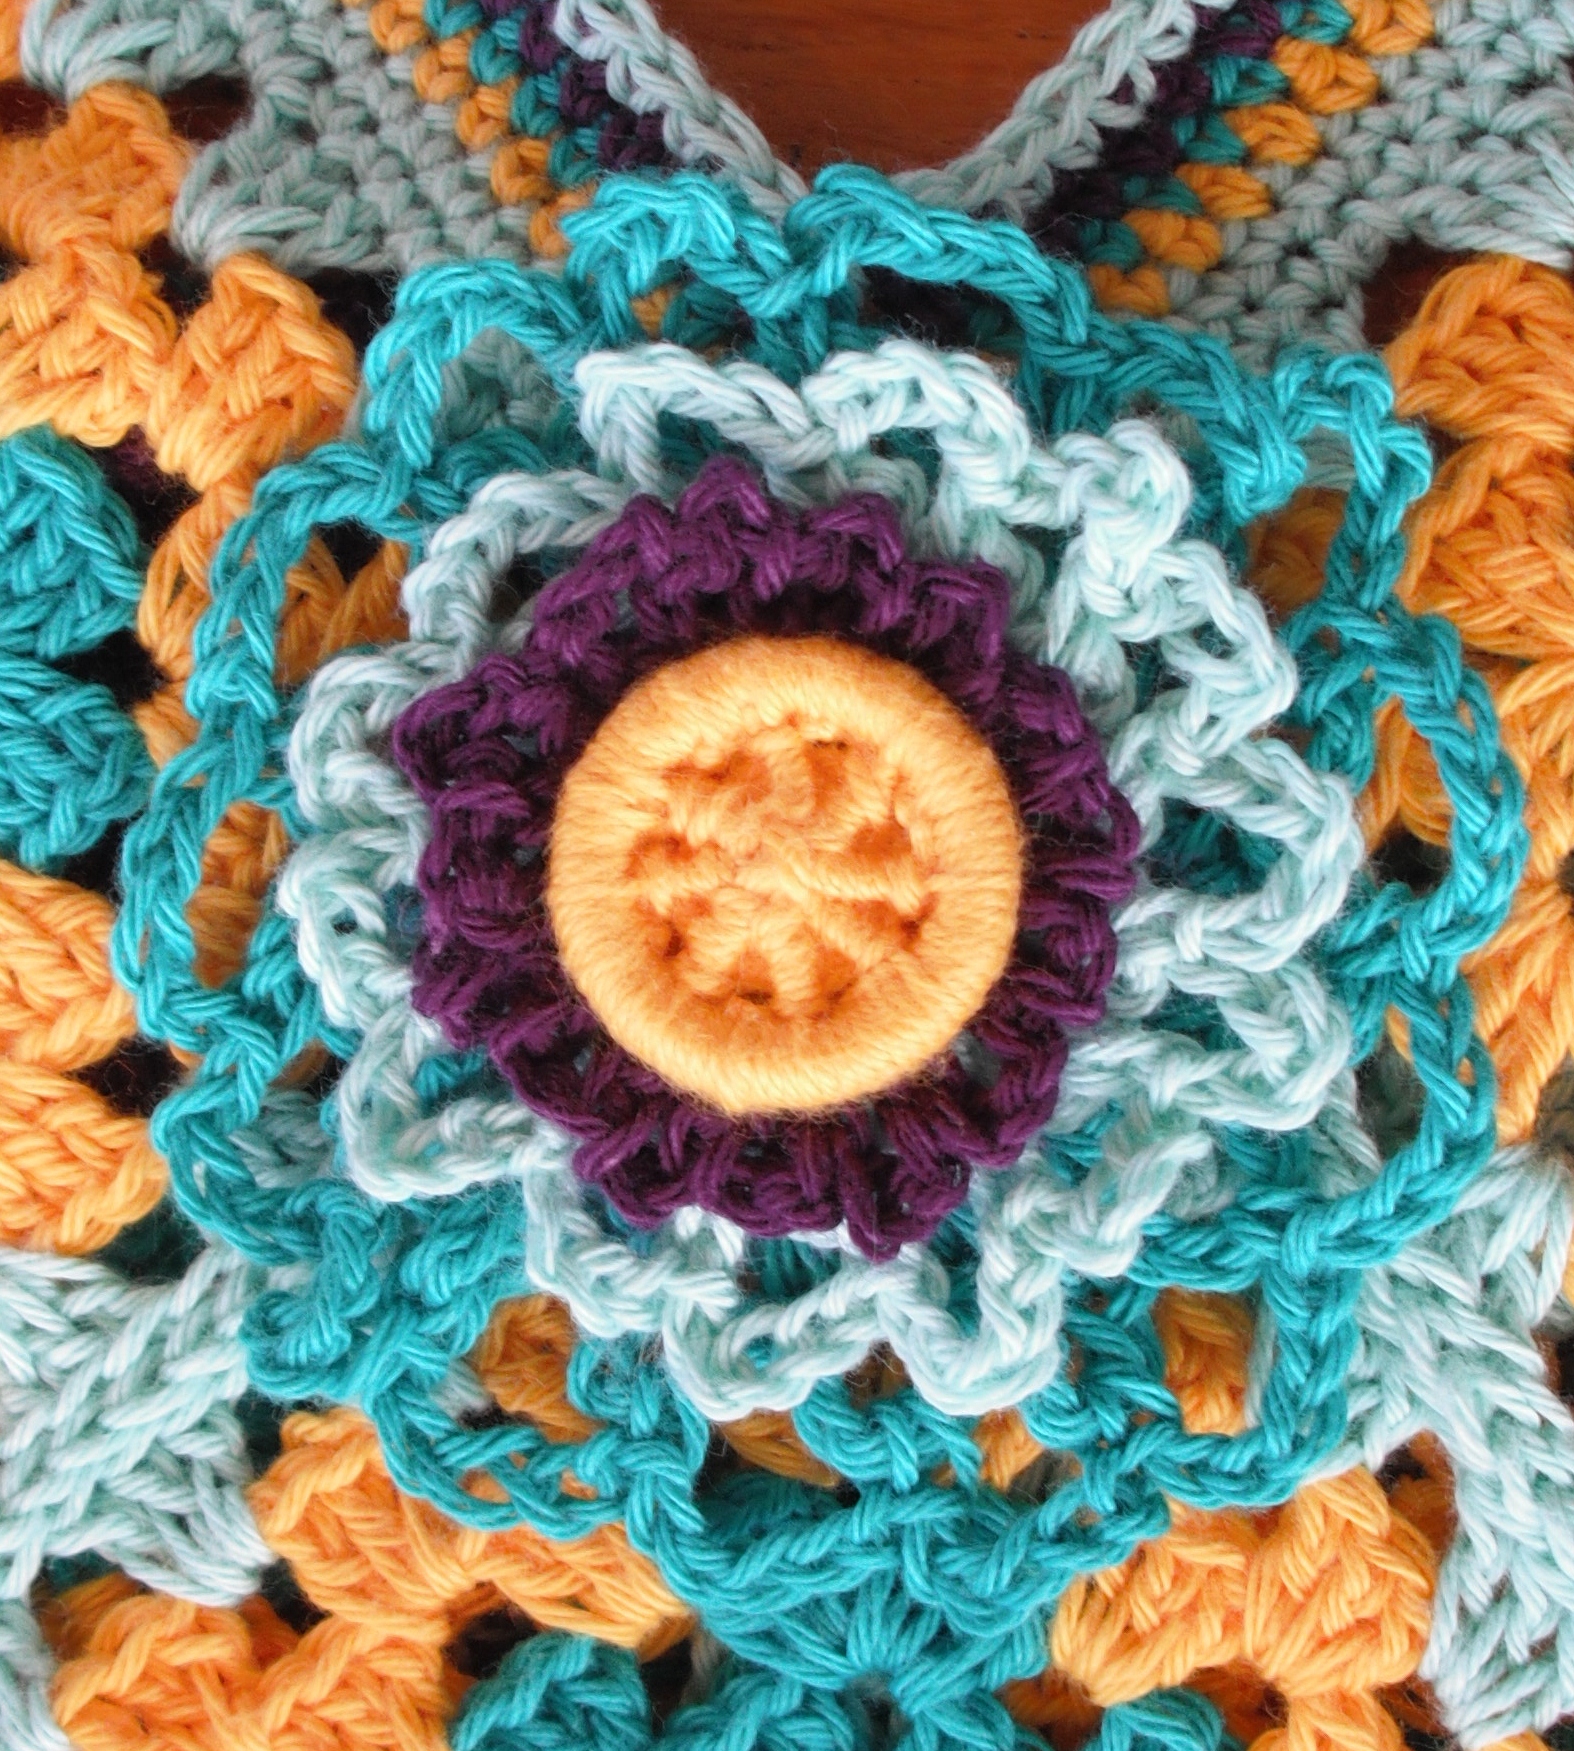
That other use just came up.  I am making a small blanket and I thought a huge granny square using the design would be perfect.  It would be quick to make but also have just enough interest to avoid being boring to make.

The blanket was started yesterday, and I have already completed 15 rounds.  I decided to swap colour every 2 rounds because the pattern changes then (which is what I did intuitively on my original swatch).   But when I got to Round 6 I thought it looked familiar.  And then I realised it is similar to Attic24’s cosy stripe blanket.  Of course, it wasn’t planned and it does have 2 significant differences – firstly it is a granny-style square not a stripe and second I use some chain sts in this square.

If you wanted to make an Attic24 cosy stripe-style granny blanket then it would be easy to adjust the pattern by removing the chain sts and adjusting the number of trebles along each ‘granny’ round – but I wanted to continue with my own design.

So here’s the pattern for you (with a sneaky peek at a part made blanket that I don’t really want to reveal):

Sneaky peek
Sneaky peek

ABBREVIATIONS

The pattern is written in English crochet terms.
St = stitch
Ch = chain
Tr = treble (US dc)
Ss = slip stitch
Sp = space
Ch-sp =chain space
I changed colour every 2 rounds, simply joining the new colour where I started each round with a ss.

Foundation:  Make a 4ch foundation ch and join into a ring with a ss
Round 1: 5ch (counts as 1tr, 2ch), (3tr, 2ch) 3 times into the ring, 2tr into the ring, join to 3rd st of starting 5ch with a ss.
Round 2: ss into 2ch-sp, (note for this and each subsequent round: this ss is to position the start of the round in the right place) 5ch (counts as 1tr, 2ch), (3tr, 1ch) into the same 2ch-sp, (3tr, 2ch, 3tr, 1ch) into each of the next three 2ch-sps, 2tr into the first 2ch-sp, join to 3rd st of starting 5ch with a ss.
Round 3: ss into 2ch-sp, 5ch (counts as 1tr, 2ch), 2tr into the same 2ch-sp, 1tr into each st around (working into the 1ch not the 1ch-sp), (2tr, 2ch, 2tr) into each 2ch-sp, and work a final 1tr into the first 2ch-sp,  join to 3rd st of starting 5ch with a ss.
Round 4: ss into 2ch-sp, 5ch (counts as 1tr, 2ch), 2tr into the same 2ch-sp, 1tr into each st around, (2tr, 2ch, 2tr) into each 2ch-sp, and work a final 1tr into the first 2ch-sp,  join to 3rd st of starting 5ch with a ss.
Round 5: ss into 2ch-sp, 5ch (counts as 1tr, 2ch), (3tr, 1ch) into the same 2ch-sp, miss 3 sts, [*(3tr, 1ch) in next st, miss 3 sts; repeat from * to next 2ch-sp, (3tr, 2ch, 3tr, 1ch) in 2ch-sp, miss 3sts] 4 times but on the last repeat of this just work 2tr into the 2ch-sp at the start of the round,  join to 3rd st of starting 5ch with a ss.
Round 6: ss into 2ch-sp, 5ch (counts as 1tr, 2ch), (3tr, 1ch) into each 1ch-sp around and (3tr, 2ch, 3tr, 1ch) into each corner 2ch-sp,  2tr into the first 2ch-sp, join to 3rd st of starting 5 ch with a ss.

Repeat Rounds 3 to 6 until you have a blanket the size you want.  I plan to finish on a Round 4 so I have a nice edge.

If you decide to make a blanket  using this design, please share a photo 🙂

Happy crocheting xxx


Spring Lifter CAL final part

This blog post shows you how to finish your bag.  It’s a bit long, but it isn’t difficult.  So please just take the time to read it and then begin the final stage.

First you need to strengthen the top edge of the bag, then you need to add handles.  I did all of this in double crochet (US single crochet).

I am using English crochet terms – check back here if you need reminding what there are.

Here is how I did it:
The diagram below shows one side of the bag.   Start each round at the point indicated by the arrow on this diagram.

granny tote side

The first 2 rounds strengthen the top edge.
Round 1:  Using Yarn D (mine was Pastel Green), work 1 round of double crochet, place 1dc in each tr or 1ch-sp along the edges.  At the top corners of the squares (Points A and B)   put 3 dc into each 2ch-sp and place a stitch marker into the middle of these 3dc.  At the ‘valleys’ work 3dc together.  Join the round with a ss.
Round 2:  work another round of dc, working 1dc into each stitch around.  At point A.   put 2dc into the stitch marked, remove stitch marker and replace into the first of these 2 dcs.  At the valleys, work 3dc together.  At point B, put 2dc into the stitch marked, remove stitch marker and replace into the second of these 2 dcs.  Repeat with points A and B on the second side.
Join the round with a ss, break yarn and fasten off.

Now you’ll make the handles.

Handles
Handles

Round 3:  Join yarn C (mine was Canary yellow) at the point shown in the diagram, work 1dc into each stitch up to and including the first stitch marker at point A, *move stitch marker to next dc along at point A, work 80ch, then miss all stitches between points A and B and work 1dc into stitch marked at point B (these 80ch will form the handle – you may wish to make them longer or shorter, so just check that you are happy with the length before continuing), work 1dc in each stitch down from point B, work 3dc together at the next valley**, work 1dc in each st up to the next point A and repeat the instructions from * to **, finally work 1dc in each st back to the start, join with ss, break yarn and fasten off.

That was the tricky bit – now you will work the top edges of the handles.
Round 4: join yarn B (mine was Sea green), work 1dc in each st around, working 3dc together in the valleys.  Break yarn and fasten off.
Round 5:  Join yarn A (mine was Heath), work 1dc in each st around, working 3dc together in the valleys.  Break yarn and fasten off.
Round 6:  Join yarn D (mine was Pastel green), work 1dc in each st around, working 3dc together in the valleys.  Break yarn and fasten off.

The final stage is to work the inner edges of the handles (the edges between points A and B that you left unworked on round 2) – there are 2 of these and you work both of them the same as follows:
Rejoin Yarn C (canary yellow) to the first stitch marker (the one you moved at point A), work 1 round of dc, placing 1dc in each st or the underside of the (canary yellow) chain of the handle, and working 3dc together in the valley.   Now work 3 more rounds of dc – in yarn B, then yarn A, then yarn D (remember to work 3dc together in the valley).

You may find that you want to add more rows of dc to make the handles larger.  Mine were perfect for my use.

You may wish to personalise your bag, and there are lots of ways you can do this. I made a little flower with a Dorset button in the centre.

Dorset button flower

First make a Dorset button – there are some excellent instructions here. I made mine in canary yellow.

Now make a simple flower.  I used this motif pattern:
Foundation ring:  make a 4ch foundation and join into a ring with a ss
Round 1: 2ch (counts as 1htr), 14 htr in ring, join to 2nd ch from start with a ss. (15htr)
Round 2: 4ch (counts as 1dc, 3ch), *1dc in next st, 3ch; repeat from * to last st, 1dc in last st, 1ch, 1htr in 1st ch from start (forming the last 3ch-sp). (15 3ch-sps)
Round 3: 6ch (counts as 1dc, 5ch), *1dc in next 3ch-sp, 5ch; repeat from * to last 3ch-sp, 1dc in last 3ch-sp, 2ch, 1tr in 1st ch from start (forming the last 5ch-sp). (15 5ch-sps)
Round 4: 6ch (counts as 1dc, 5ch), *1dc in next 5ch-sp, 5ch; repeat from * to end of round join to 1st ch from start with a ss.  Break yarn and fasten off.

To construct the flower, make 3 different sized motifs in different colours.
One using the first 2 rounds (I used Heath).
One using the first 3 rounds (I used Pastel green).
One using all 4 rounds (I used Sea green).

Place the motifs on top of each other, place the Dorset button on top of all 3 and sew together.  Then sew to the bag.  And voila – the bag is made!

Zingy spring lifter
Zingy spring lifter

Of course, you could personalise your bag in any way you like, add a lining, lengthen or shorten the handles, add  buttons, flowers – anything!   Whatever you do, please show me what you make on my Ravelry forum.

Happy crocheting xx

Spring Lifter CAL part 2

This week I’m going to show you how to turn the motifs into the bag shape.  Here’s a reminder of the bag, so you know the shape you are aiming for:

Zingy spring lifter
Zingy spring lifter

First you need to block them.   If you leave it until you finish the bag you may find it a bit tricky.

Then you need to decide how you are going to join them.  I recommend joining in one of these 4 ways:

  1. By slip stitch holding the motifs right sides together, as I did for the Christmas CAL here.
  2. By double crochet (US single crochet) holding the motifs wrong sides together.
  3. By sewing.
  4. By slip stitch holding the motifs side by side, this is the method I used and I worked into the back stitch only.  You may find this a bit tricky if you haven’t done it before, but I think it gives a good effect and is worth that extra effort.  This shows you the technique:
Slip stitch side by side back loops only

And the finish:

Joined
Joined

I joined my bag using the same yarn that I used for the last round of my motifs – the Pastel Green.

To form the bag shape you need to join them in a particular order.  And I have illustrated this in the following diagrams:

Granny Tote Joining
Granny Tote Joining

It will take a while for you to make you bag shape, and you may find the last bits a little tricky.  So I will share how to finish your bag next week.

Keep posting progress and asking questions on my Ravelry forum.

Happy crocheting xx

My Spring Lifter!

Here is what I have been making this week:

Zingy spring lifter
Zingy spring lifter

It is in zingy colours and is lifting my mood, making me think of Spring even though we are still in Winter here in the UK.  I have seen similar bags but never attempted to design one like this before, it was easier than I imagined it would be!  So I thought you might like me to share how I made this with you.

I will be posting 3 blogs on the ‘how to’.

If you want to join in you may wish to start gathering your equipment now.

I made my ‘spring lifter’ in a 4ply/fingering weight cotton in a chosen colour scheme.  However this can be made in any yarn weight and would be a fabulous stash buster.  Remember if you use a different yarn weight you should use a suitable hook size.

So here is what I used:

YARN
Scheepjes Cotton 8, 50g/170m/186yds per ball.  I used 4 colours:
A – 1 ball of Heath (721) – a deep purple
B – 1 ball of Sea Green (723)
C – 2 balls of Canary (714) but I used only about 5m/yd of the second ball
D – 1 ball of Light Pastel Green (663)

HOOK
3mm crochet hook (US D/3)

OTHER
4 lockable stitch markers
Tapestry needle for sewing ends
Ring for Dorset button (optional) for the centre of my simple flower.

Start gathering your equipment and I’ll post part 1 of the ‘how to’ tomorrow.

Meanwhile, I have started a discussion on my Ravelry forum here, if you want to join in this CAL please join in the discussion too.  I’d love to see what you make.

Happy crocheting xx

Christmas CAL part 3

I’ve been busy today, so I apologise for being a bit late with this post.  My ‘busy’ was a family gathering.  It is always lovely to see the family, especially at Christmas.  And I do enjoy the catering for a crowd, which I don’t do very often.   Perhaps if I catered for a large group more frequently I wouldn’t enjoy it as much!

So now I am ready for some relaxing crochet.   Are you ready for the next motif?    I hope so, because here it is:

First a reminder of the ABBREVIATIONS:

The pattern is written in English crochet terms.

St = stitch

Ch = chain

Tr = treble (US dc)

Ss = slip stitch

Sp = space

Ch-sp =chain space

This is the third motif design, I am making 10, 2 in each of my chosen colours.

I call it the GRANNY 3 MOTIF:

Granny 3 motif
Granny 3 motif

Foundation:  Make a 4ch foundation ch and join into a ring with a ss

Round 1: 5ch (counts as 1tr, 2ch), (3tr, 2ch) 3 times into the ring, 2tr into the ring, join to 3rd st of first 5ch with a ss.

Round 2: ss into 2ch-sp, (note for this and each subsequent round: this ss is to position the start of the round in the right place) 5ch (counts as 1tr, 2ch), (3tr, 1ch) into the same 2ch-sp, (3tr, 2ch, 3tr, 1ch) into each of the next three 2ch-sps, 2tr into the first 2ch-sp, join to 3rd st of starting 5ch with a ss.

Round 3: ss into 2ch-sp, 5ch (counts as 1tr, 2ch), (3tr, 1ch) into the same 2ch-sp, *(3tr, 1ch) into the next 1ch-sp, (3tr, 2ch, 3tr, 1ch) into the next 2ch-sp; repeat from * another 2 times, (3tr, 1ch) into the next 1ch-sp, 2tr into the first 2ch-sp, join to 3rd st of starting 5ch with a ss.

Round 4: ss into 2ch-sp, 5ch (counts as 1tr, 2ch), 2tr into the same 2ch-sp, 1tr into each tr and 1ch-sp along each side and (2tr, 2ch, 2tr) in each 2ch-sp on the corners, finish with 1tr in the first 2ch-sp and join to 3rd ch from start with a ss.  You should have 15tr along each side and 2ch in each corner of your motif.

Round 5: ss into 2ch-sp, 5ch (counts as 1tr, 2ch), 2tr into the same 2ch-sp, 1tr into each tr along each side and (2tr, 2ch, 2tr) in each 2ch-sp on the corner, finish with 1tr in the first 2ch-sp and join to 3rd ch from start with a ss. You should have 19tr along each side and 2ch in each corner of your motif.

Round 6: Repeat Round 5. You should have 23tr along each side and 2ch in each corner of your motif.

Break yarn and fasten off leaving a long tail about 3m long for sewing or crocheting together later.

Tomorrow, yes so soon, I will publish the last 2 motifs.  I know some of you are powering away with your hooks, I can see the smoke from here!  And those of you who haven’t progressed as quickly may like a little variety.

On Wednesday I will share my 2 proposals for layout, suggestions on how to join and my little embellishment.

And on Friday I will give you ideas on edging – mine will be simple.

As always, how you finish your blanket will be up to you, so all my ideas are only here to help inspire you.  I love seeing variations, so please feel free to adapt as you like.

Please share your progress on the discussion thread on my Ravelry Group here.

Happy crocheting xxx


Now for the legal stuff – I designed this, it’s all my own work and is copyright. Please feel free to make as many as you like, but not for commercial purposes, and please credit me with the design. Thank you!

Christmas CAL part 2

How are you all doing?   Did you finish the motifs from part 1?

I didn’t do too much yesterday, I was far too busy eating and drinking!   But I did have a flash of inspiration after all that excess, a little embellishment for the blanket – so this will be included in one of next week’s updates.

I have seen some progress on Ravelry, and I know some of you have completed 9 squares and therefore must be ready for this instalment.  So here it is:

First a reminder of the ABBREVIATIONS:

The pattern is written in English crochet terms.

St = stitch

Ch = chain

Tr = treble (US dc)

Ss = slip stitch

Sp = space

Ch-sp =chain space

This is the second motif design, I am making 10, 2 in each of my chosen colours.  I call it the FULL MOTIF 1:

FULL MOTIF 1
FULL MOTIF 1

Foundation:  Make a 4ch foundation ch and join into a ring with a ss

Round 1: 5ch (counts as 1tr, 2ch), (3tr, 2ch) 3 times into the ring, 2tr into the ring, join to 3rd st of first 5ch with a ss.

Round 2: ss into 2ch-sp, (note for this and each subsequent round: this ss is to position the start of the round in the right place) 5ch (counts as 1tr, 2ch), 2tr into the same 2ch-sp, 1tr into each tr along each side and (2tr, 2ch, 2tr) in each 2ch-sp on the corner, finish with 1tr in the first 2ch-sp and join to 3rd ch from start with a ss. You should have 7tr along each side and 2ch in each corner of your motif.

Rounds 3 to 6: Repeat Round 2. The number of tr along each side increases by 4 with each round. So after Round 3 you have 11tr, after Round 4 you have 15tr, after Round 5 you have 19tr and after Round 6 you have 23tr.

Break yarn and fasten off leaving a long tail about 3m long for sewing or crocheting together later.

Please share your progress on the discussion thread on my Ravelry Group here.

Stay tuned for the next instalment, which I aim to publish on Sunday……..

Happy crocheting xxx


Now for the legal stuff – I designed this, it’s all my own work and is copyright. Please feel free to make as many as you like, but not for commercial purposes, and please credit me with the design. Thank you!

At home

I have just completed a very colourful scarf, quite traditionally crocheted using square motifs. It is one of a series of scarves that I am designing this year – one for each month. I am a little behind, almost the end of March and this is the February scarf!

February Scarf
February Scarf

It is unusual for me to design something using a square motif (you know how I love hexagons) and also very colourful when I tend to be a lot more subtle. But it is nice to have a little colour occasionally, isn’t it? I just hope it isn’t going to be a trend for me – lots of colour and lots of squares – feels a bit too traditionally ‘granny’ to me!

I was reminded about traditional crochet very recently. It is a long story that I will not bore you with, but a good friend told me she first thought of crochet being something used for those kitsch toilet roll covers – you must remember them, dolls with huge crochet skirts, frequently in pink. Oh, my how horrendous they were, I can laugh about it now but there was a huge trend for them when I was young!

My thoughts turned to how I use crochet in the home. I love throws and blankets, absolutely love them. Crochet lends itself extremely well to throws and blankets. I have them for the bed, the sofa, the cat bed (yes, a very cosy spoilt cat!), chairs, the garden – they are very useful and versatile.

Throws galore
Throws galore

I have made cushion covers also and I am making some now to match the colour accent in my lounge. Bunting also features – mainly at Christmas but I do have some in my shed, and sometimes drape some in my craft room. Some customised jar covers, which hold a host of hooks needles, pens etc. And finally a small curtain over the tiny window on our front door. And that’s about it – the total of my home use of crochet. For me that’s just enough but I expect some people may say it is too much.

Still thinking about this I picked up a couple of crochet magazines and looked at home crochet ideas (not that I plan to expand my home use!). I was surprised to see there is a huge amount. It didn’t used to be that way. Looking at older magazines I’d say roughly 90% of the patterns were garments and accessories and 10% home. Very recent magazines seem to be the reverse (mmmmmm………… maybe a tiny exaggeration!). Now if the home patterns were mainly throws and blankets I wouldn’t be too concerned, but it isn’t and I am fearful those toilet dolls will be making a comeback soon.

This worries me. Is this a dumbing down of the crochet world? I do hope it is a short lived trend, because there is so much more to crochet than little things for the home. It is a glorious craft and should not be confined to four walls – wear it and be proud!

So tell me – do you do much crochet for the home? And what do you think of magazine trends? I would love to know your views.

Happy crocheting xx

Colour in crochet

I‘ve been thinking a lot about colour recently. Perhaps because I’ve been making colourful hexagons for a few weeks ahead of the launch of The Hexagon Project 2014 which I blogged about yesterday here: https://agrarianartisan.com/2014/01/31/the-hexagon-project-2014/

I like to think I use a subtle colour palette in what I do. If you saw my home youwould see it is fairly modern with plenty of oak and neutral shades everywhere – just odd splashes of colour for accent. But I do love colour in many things, just as long as it isn’t glaring out at me from every corner. So I am not afraid to use colour provided it fits in my world.

You won’t find much multi colours in anything I make or design – just look at my Ravelry project and design pages to see how I use colour!

However, my thoughts have made me reflect on the blankets I have made over the years.

The first blanket I ever made was a granny in shades of blue, mainly pale blue. It served me well at uni. It was thrown out years ago – so I don’t have a photo of it. Believe me when I say it was subtle, not glaring.

The second blanket I made was a small knitted hap blanket – beige with red highlights.

Hap blanket
Hap blanket

Then came Starry Night by Amanda Perkins, I made it in grey, silver and 2 shades of dark blue.

Starry Night
Starry Night

The fourth blanket I made was another design by Amanda Perkins called Lily. This time I started to use more colour – I wanted lots of red – and that is what I got!

Lily
Lily

The next blanket (knitted) was back to my neutral shades.

Heike's afghan KAL
Heike’s afghan KAL

Then no 6 was a baby blanket in ice cream colours

Baby blanket
Baby blanket

And then a small lap blanket in soft blue, green, cream.

Little Hearts
Little Hearts

Then I made a granny style blanket in lots of colour – quite a change for me! It is confined to the spare bed and is very practical. But I do quite like the colour pick-me-up as I walk in that room.

Poppet's Blanket
Poppet’s Blanket

The first blanket for this year is very colourful, it is another Amanda Perkins’ design and I blogged about it here: https://agrarianartisan.com/2014/01/25/kaleidoscope/

I have also made 2 other blankets recently, I’m not going to tell you about them yet, other than to say one is ‘nicely’ colourful and the other is back to my more subtle colour palette.

Now all of this has made me think about the world of crochet. There are so many fields of crochet in the world from the delicate old Irish crochet used frequently in crisp white doillies to the bright colourful world of simple but effective granny squares, with a myriad of styles, taste and colour inbetween. The recent growth in the crochet world has been predominantly in the colourful granny area – after all it is easy to see the impact of colour and grannies are quite quick and easy to make when you are just getting going.

Just recently I have started to sense a slow change in that colourful granny world, maybe, just maybe, it is growing closer to my preferences of subtlety. I think it is about time it should.

Personally, in the world of colourful crochet my preference is always in the direction of Amanda Perkins, her use of colour is exceptional. It is so much more sophisticated than the granny world. If we are to use colour in the world of crochet it is much better to do with sophistication don’t you think?

Yes, I would dearly love to know what you think, so please share your thoughts with me.

Happy crocheting xx

Edit: just after pushing the ‘publish’ button, I read the latest blog by Lucy of Attic 24 which only served to confirm my sense of colour shift! http://attic24.typepad.com/weblog/2014/02/colour-play.html

Getting Festive

I am sure you are wondering if I met the WIP challenge I mentioned in my last blog. Well I am pleased to say I did – but only just! So for the last 10 days I have had the luxury of starting some new projects.

This year I have not made many Christmas presents, I decided it would be good to take a year off making them and I am sure it will be a relief to my family and friends as they have already received hat, mitts and scarves over the last 3 years! But I still feel the need to make something for Christmas. So my new projects have been festive – I have thoroughly enjoyed making some decorations to adorn the parcels I will wrap:

Wrappings....
Wrappings….

These use some of my festive snowflakes. Pattern here: http://www.ravelry.com/patterns/library/festive-snowflakes

And some new bunting to adorn the house:

Festive Bunting - Granny Style
Festive Bunting – Granny Style

Which I absolutely love! Pattern here: http://www.ravelry.com/patterns/library/christmas-bunting—granny-style

I also found time to design a new snowflake for Kerry. I am calling it Snowflake 2013 and I think I may have set myself a new challenge – to design a new snowflake each year! This snowflake features on Kerry’s blog. You will find the chart for it there as well as a video tutorial – and it’s free. So pop over and have a look, I am sure you’ll be crocheting your own snowflakes soon!

http://oddmentsblog.wordpress.com/2013/11/14/crochet-tutorial-christmas-snowflakestar/

Snowflake 2013
Snowflake 2013
Happy Knitting and Crocheting xxx

An Anniversary…..

An Anniversary

In my last blog, I mentioned the special date of 27th August being the 1st anniversary of my Ravelry forum. I can now disclose the 2 designs made for that anniversary.

The Anniversary Sharf (knitting):

DSCF0981

And the Simple Circles Scarf/Wrap (crochet):

DSCF0955

If you are a member of Raverly, join my forum on there (Agrarian Artisan Designs), establish a project linked to one of the 2 designs above and tag it properly before 1st September 2013, I will gift the pattern to you via Ravelry….and then you can join in the fun, knitting or crocheting with other like minded folk 🙂

Happy knitting and crocheting xx